Visualization

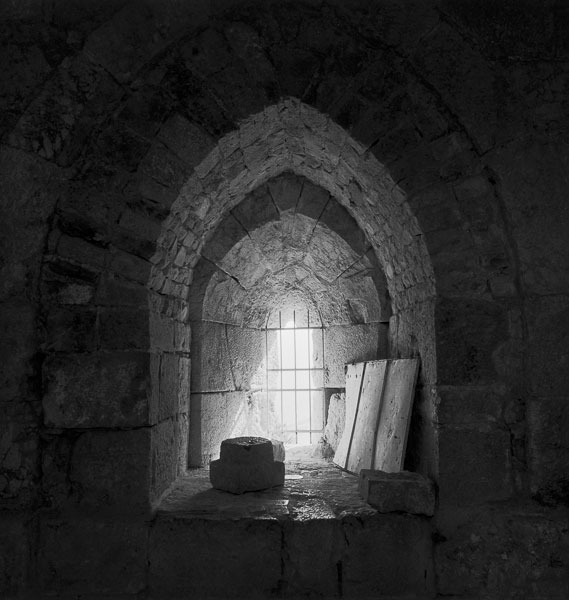
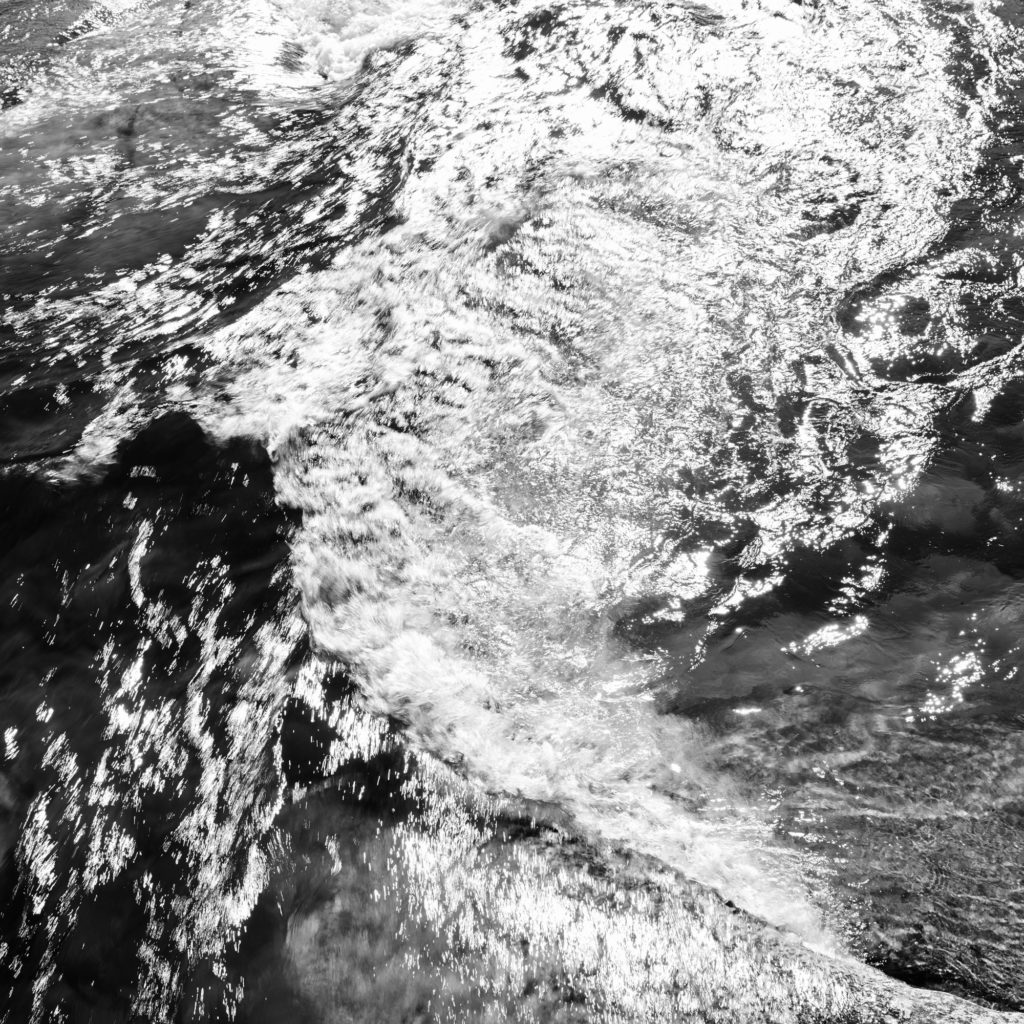
Celestial Cascade, Tuolumne River, Yosemite, California
Nikon D810 with Sigma Art 35mm f/1.4
1/45 sec, f/10, ISO 64

Photographs aren’t just about what we see, but about what we feel, what we believe. 

Visualization is one of my most important tools in that lofty goal when I’m trying to “see” and make a photograph.  Put simply, before I even take out the camera, I see in my mind’s eye what I want the final image to look like, and I use that visualization to direct all the creative choices in exposing and processing the photo. 

This may seem unimportant when a digital camera can give us a instant preview after we click the shutter, but visualization goes beyond that. That little camera LCD screen can’t show us all the possible processing choices we might make, nor can it match the range and depth of a final print. The visualization a skilled photographer makes goes way beyond what the camera can display. 

I find this to be particularly true in black and white, and by learning to visualize better, it opens our eyes to new possibilities. It can enable us to “see” better, both what is in front of the camera, and what is in the mind of the photographer. 

Take for example the photograph above, Celestial Cascade, Tuolumne River, Yosemite, California.   

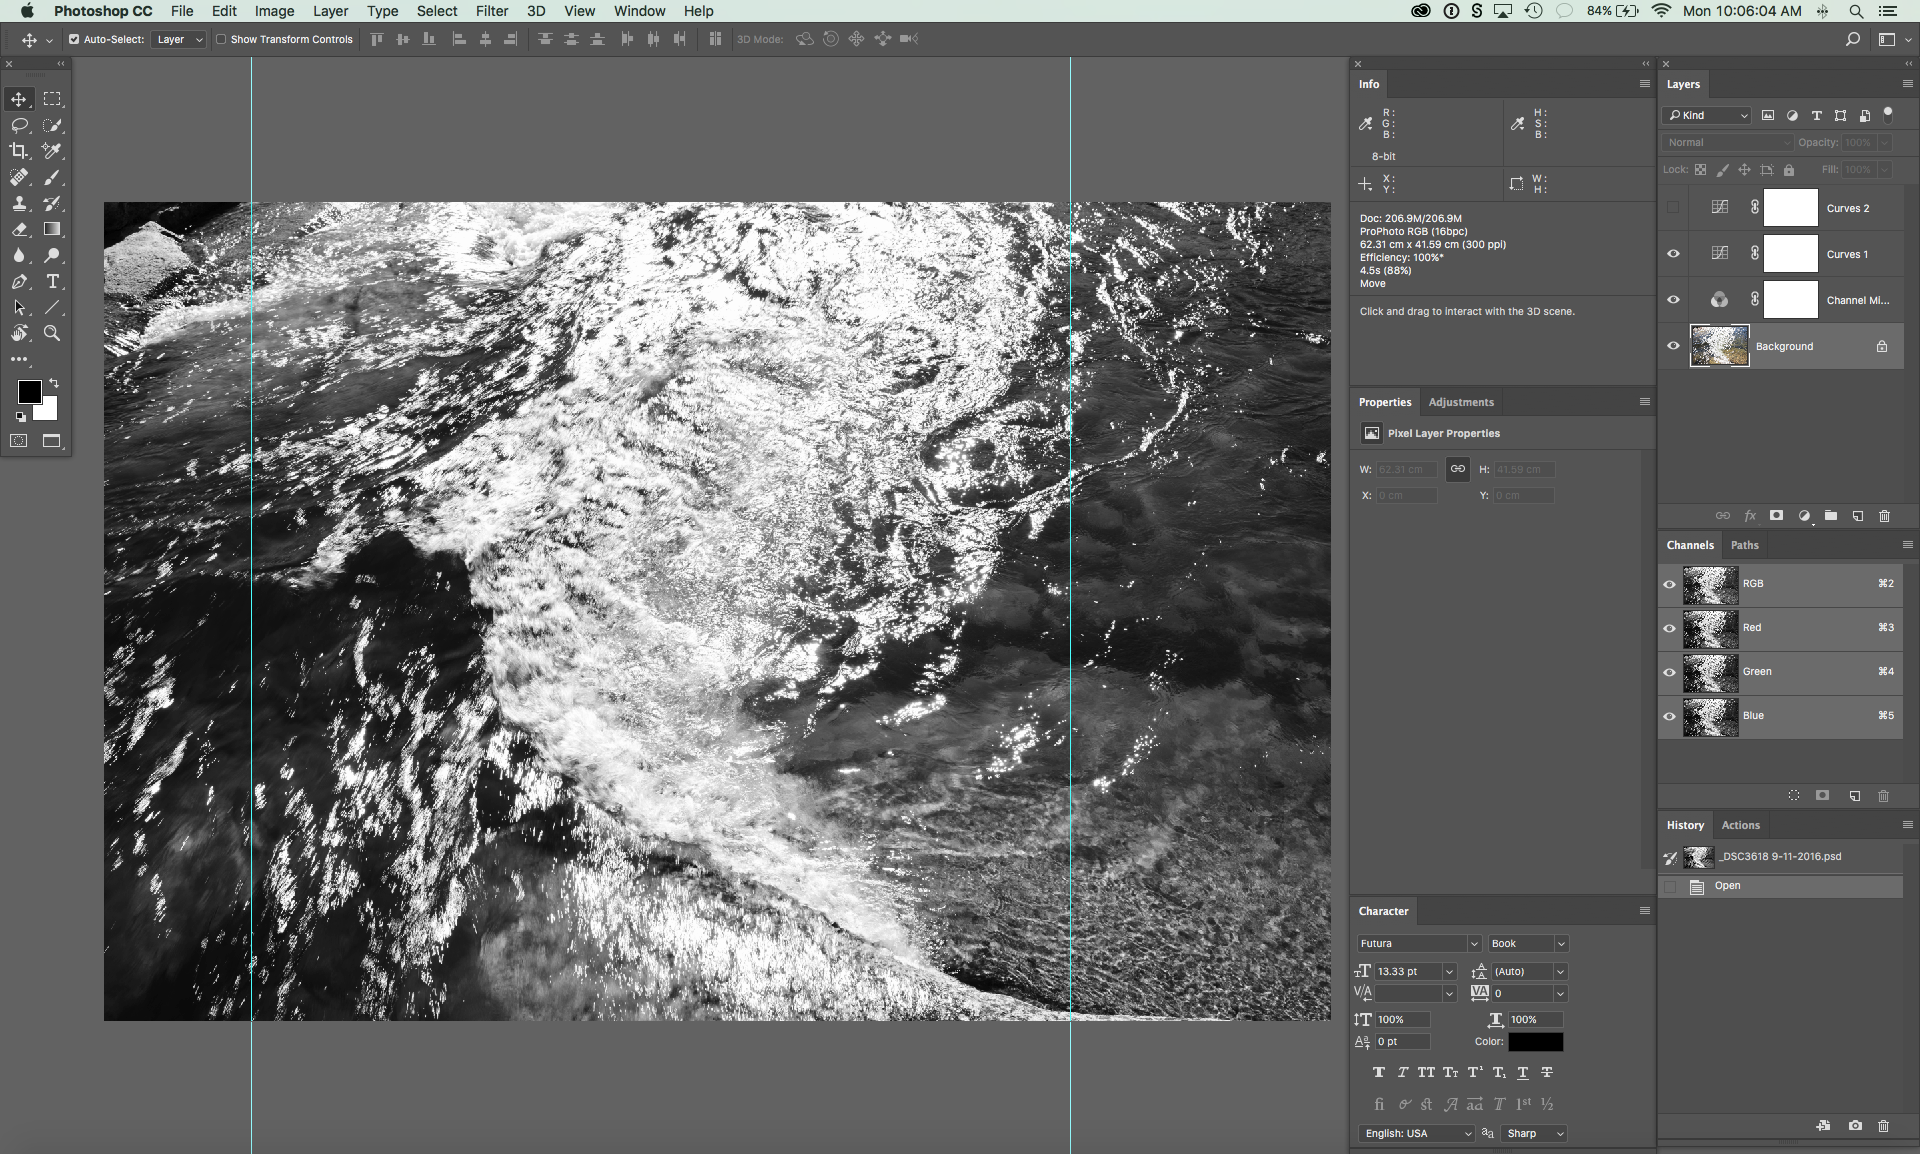
Since this photograph is in black and white, what you see above is not what my eye saw. To the naked eye, it looked like this:
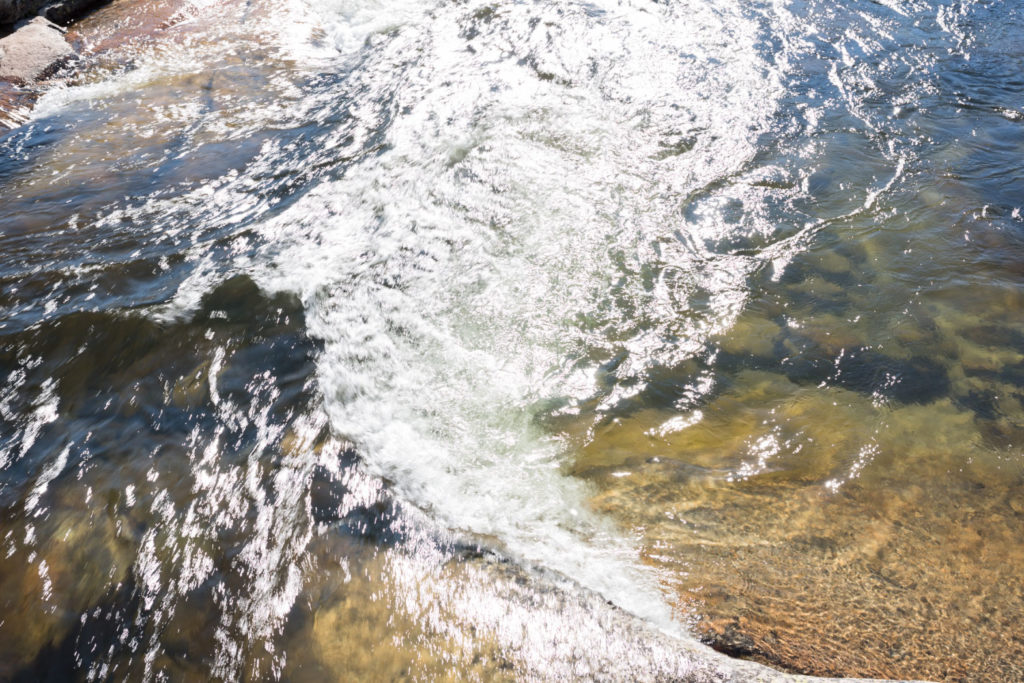
As part of a short hike with my family, we stopped to enjoy a favorite section of river and the coolness of this mountain stream. As my kids played with the rocks and waded, I had a few moments of quiet. The time of day didn’t seem conductive to making photographs, with high sun and contrasty light. But as I watched the water and contemplated the beauty of the scene, I found myself enjoying the patterns made as the water surged under the bridge and built into a wave, with the patterns of white foam it produced, and the play of sunlight reflecting as a million stars on the ever changing surface. The patterns reminded me of my friend David Ashcraft’s photograph “Universe Expanding”, and I knew if I just looked more deeply, I could express what I was seeing and feeling. I wanted to turn this little patch of the Tuolumne river into a proxy for the the infinite sea of stars in the night sky, and into the deeper realities of that infinite nature for which words are hard for me to find. 

At this point, my camera is still in the bag, but my mind is fully awake. The color was not interesting to me, so I decided that this should be in black and white. Once I switched that switch in my mind, things started to become clearer. I wanted the photograph to focus on the water and the patterns of sunlight and motion. Contrast would let me do that, and then all of a sudden, I saw in my mind exactly what I wanted the print to look like. It was at that moment that I went for the camera bag, and worked through the settings that I thought would give me what I saw in my minds eye. I was without a tripod and trying to work more freely, so I had to work within the shutter speeds that would let me hand hold the camera. I wanted some blurring of the water, but the light was so bright that even at ISO 64 and f/10 I was still at 1/45 of a second, but that happened to work out well for what I wanted to show. 

The thing about visualization is that it makes processing easier to a degree because you already know the look you want before you even open the file. That visualization guides your steps and choices of tools. 

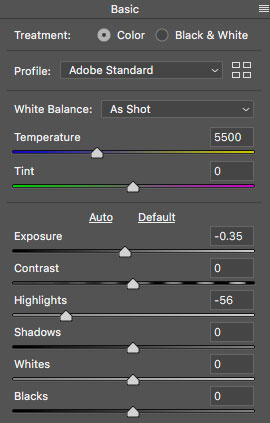
RAW processing was pretty minimal. I just brought down the exposure and the highlights a little to try and hold detail in the foamy water. 

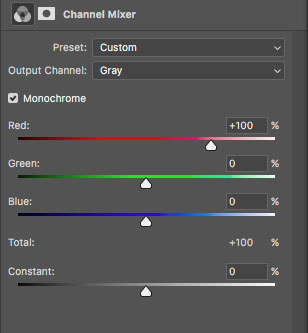
The Photoshop adjustments are all global changes. First I used Channel Mixer to convert the image to black & white using the red channel, as I liked how it allowed some of the shapes of the underlying rocks to come through. 
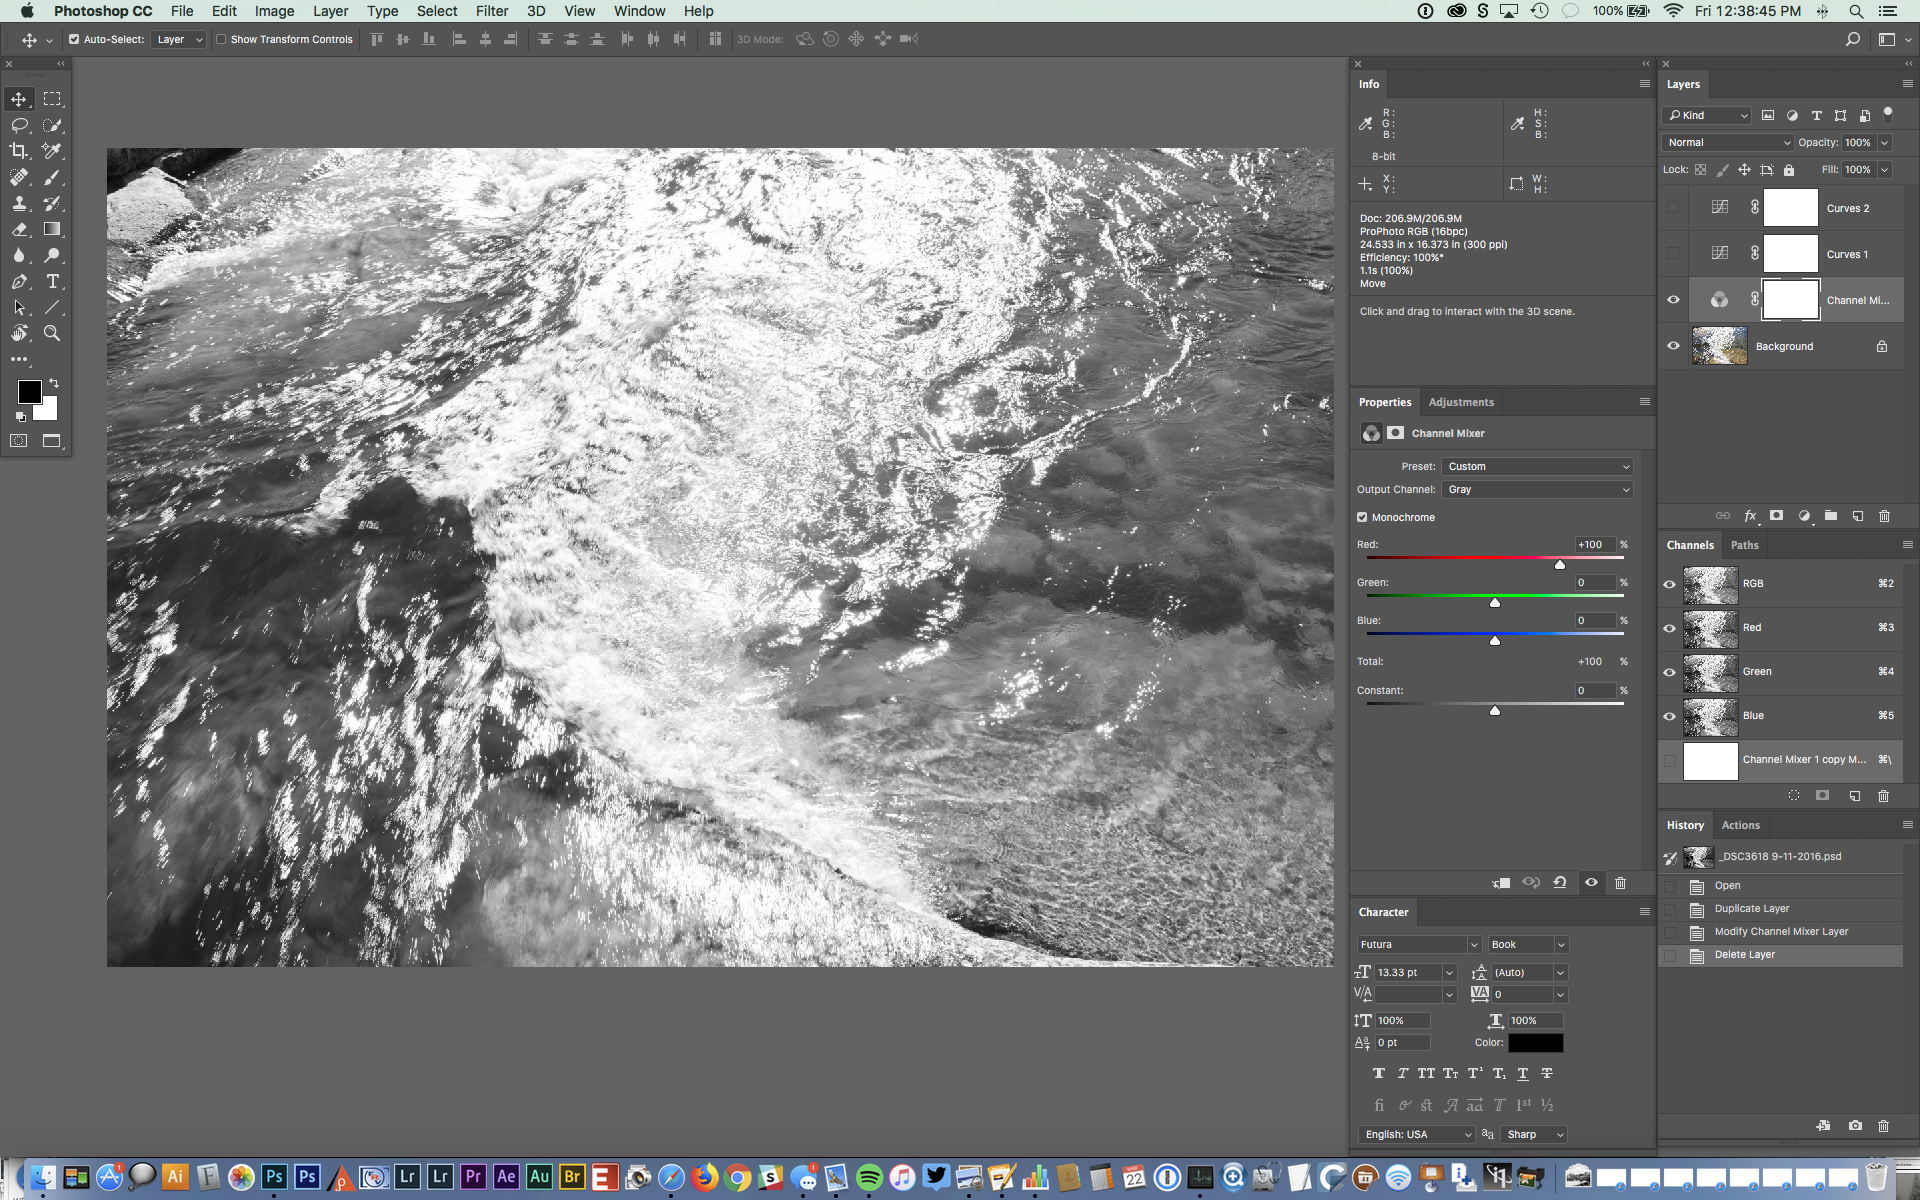
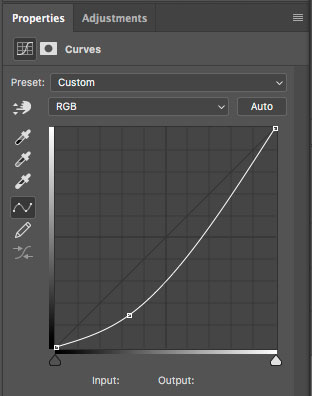
Then I added a simple one point curve that darkened the image overall, but by the placement of the point, biased that darkening to the shadows and midtones. This is one of the reasons I really like curves. They give me the instantaneous ability to exercise very precise control over how and where changes to density and contrast is applied. Instead of the linear “more or less” of a slider, I can move the points in both the x and y dimensions, as well as decide how many points to use. Points create inflection points that change how the curve works up and down slope, and those inflections are where I find the control to achieve what I envision. 

The file shows I played with a second curve as I looked at some alternative tonal relationships, but rejected that for my original curve. 

I want to draw attention to how simple this was to process. A single frame camera exposure, two minor moves in RAW, a simple conversion to black and white, and one curve with one point. This is an exercise in working with the materials, and seeing “through” them to how they can work at their most fundamental level. I’m not opposed to greater complexity in processing, but the more you work “with” the process, the easier making a photograph can become and the more you free your vision. 

My final step for this photo was cropping. Cropping is a creative decision for me, and I usually play with crops on every photographI make in attempt to find the composition that best draws attention to the subject. The goal is to eliminate as much distracting information as possible. Also, I’m not fond of the 2:3 ration, and I prefer the more squarish 4:5, and as well as the 1:1 square. I often find the 2:3 just includes too much and makes it hard to create the tension I like in a composition. 

For this photograph I settled on a 1:1 square crop, which I mark using the cyan “guide” lines, which are saved in the file so I know how to crop the Master File when making targeted files for screen or printing. In many things, Photoshop provides multiple paths to the same solution. I’ve been using this for crops since before Photoshop added a way to preserve crops, so it’s what works for me. 
The end result is something I wanted to say, but for which I had no words. Through visualization and applying the craft of photography, I was able to give voice to that vision, and in this case, the result is an expression of something I felt, more than what I saw before the camera.
Buying A Printer

Buying a printer can be a big decision and a significant investment. I’m posting these quick thoughts from an email with a client today to start your brain thinking about some of the decision points, and I hope to expand this into a full article in the future.

To buy a printer or not is a big question. It comes down to a couple things:

1. will it make you money?

2. will it really save you money?

3. Is the cost inconsequential compared to the convenience? 

4. Will it give you control you can’t get with a lab?

5. Do you need the faster turnaround times. 

A printer is like getting a dog, it has needs (ink, paper, maintenance, profile making/testing) that cost money and will always be there, and you need to take care of it. Unless you print a lot, the total cost of ownership is going to be close to just sending out, but if you want to print a lot, it makes those individual prints less expensive.

At the $400 price point, a printer can be more easily justified. Once you get to the $1,000 17×22 printers, you have to be printing enough to make it work out.

Printers should be viewed as consumable/disposable items, as painful as that sounds. They are made to work for a couple years, not forever, and the manufacturers expect you to upgrade. Do not look at it as a long term investment. It’s not like buying a car, it’s like buying tires, you expect them to wear out. 

Thoughts or experiences? Share them in the comments!

One Day Printing Workshop – July 13

Hands on learning is of incredible value to improving your printmaking skills, so I’m excited that Watkins College of Art is having me teach a one day workshop on July 13th.

The format of this workshop is very simple. I’ll look at your photographs, suggest changes, and then you can work through those changes with my help and immediately make new prints for further evaluation in the excellent computer/print lab at Watkins.  

This rapid feedback loop allows leaps of knowledge and understanding to happen quickly. I’ve seen students make incredible strides in short periods of time with this process, and I know it can be of huge benefit.

This is not a step by step teaching class for an imaging editing program. It assumes you have some level of comfort and familiarity with an image editing program and with making prints. You don’t need to me a expert, that’s the whole point, but you need to know where the gas, brakes, and turn signals are, so to speak. 

You can bring your own computer with your imaging editing program, or use one of their macs with Photoshop or Lightroom. I don’t care what software you use, as the goal of achieving good contrast, density, and color are universal to all photographs. 

One requirement for this class is a ten print portfolio and corresponding edited and un-edited files. Don’t be intimidated by this…I’m not looking for anything fancy. Just ten 8×10 or 8.5×11 prints of photos that you think represent your work. The goal is that you’ve already printed them once, and that we can look at them immediately and jump in to learning. For students who register early enough, I’m going to try and evaluate these before the workshop so that we can get the most out of that one day. 

Registration for this class starts April 1 on the Watkins Community Education website.

The workshop runs from 10am to 4pm and the cost is $110.

If you have any questions about this workshop and if it is right for you, please email me at rich@richseiling.com

Last Across the Pass

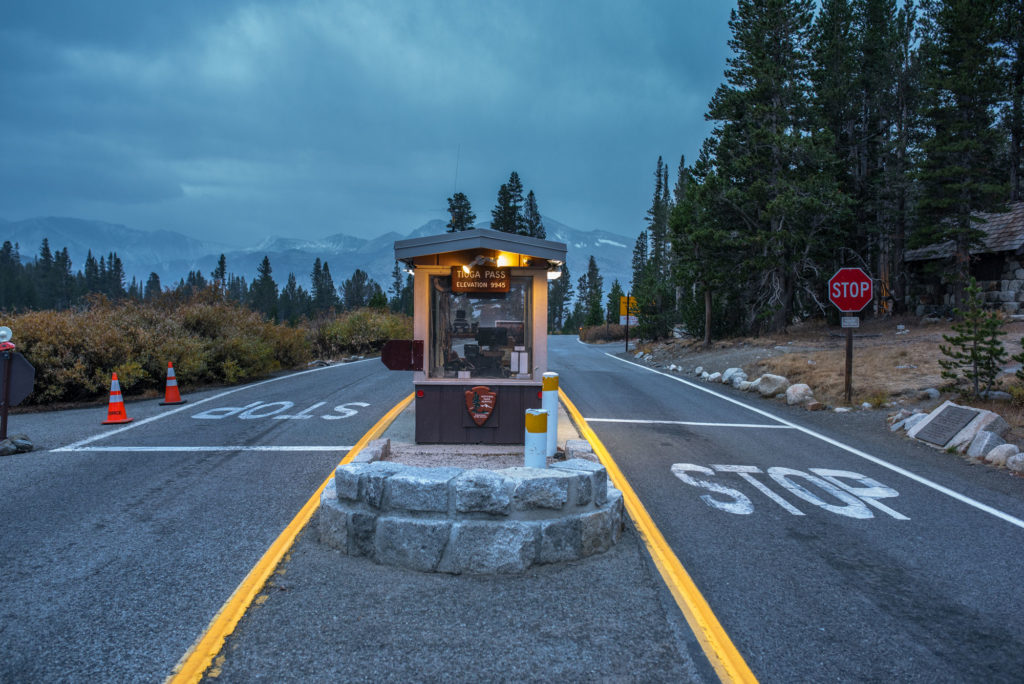
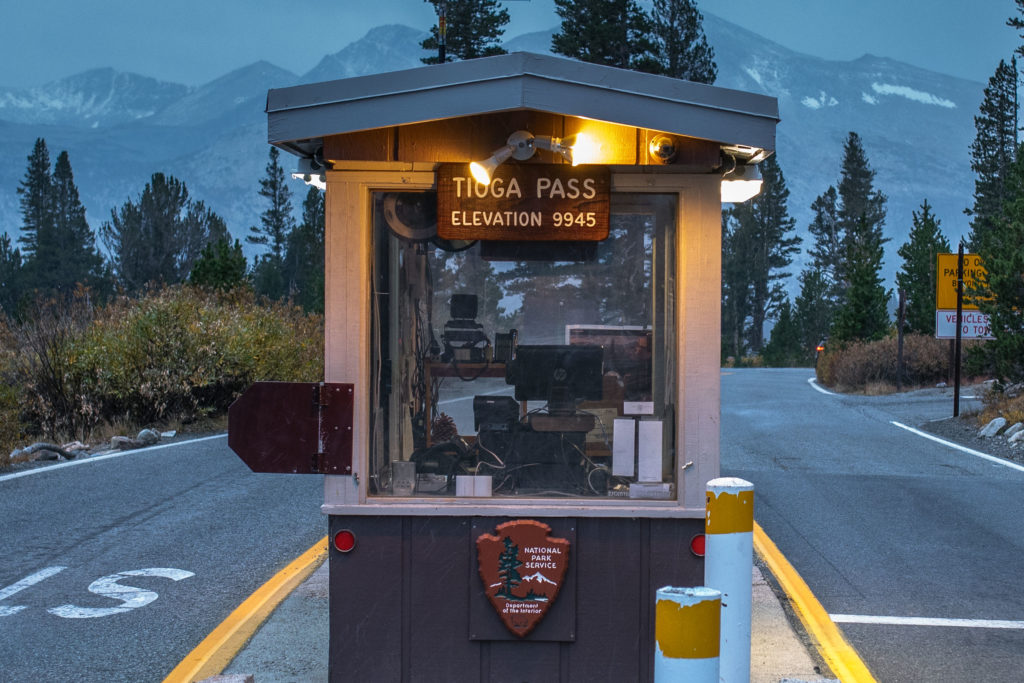
Tioga Pass, Elevation 9945 feet, Yosemite National Park

Sometimes a few minutes is the difference between a 3 hour drive home or a 9-12 hour trek around an entire mountain range. This October night in 2016, I pushed it right to the edge. 

Yosemite’s Tioga Pass Road, peaking at 9945 feet elevation, provides access to the stunning Eastern Sierra, but can close suddenly during storms. The Yosemite photographers call this gamble “East Side Roulette”, and it’s a game of “will the storm close the pass before I make it home.”

After an exceedingly windy day exploring aspens with my family, the approaching clouds said it was time to go. I swear I heard the drums from the Braveheart soundtrack driving me to hit the road. If we didn’t stop to eat, it would be three long hours before the next food services. My wife wanted to stop and eat at The Mobile Station, but I convinced her to just get our food to go, the urgency of the storm in my head. I munched down my pizza while driving up the steep drop-offs of Tioga Pass to quickly worsening conditions. 

As we reached the top of the pass, the snow was already starting to fall, as you can see in the zoomed in crop. I stopped to make one last picture as the light faded, as I knew some big life changes were coming soon, and I wanted to mark this personally meaningful day at one of my favorite places. 

Faint streaks of spitting snow that would become a giant winter.

We resumed the drive, and snow started to cover the road, with no lines and only one fading set of tire tracks to follow, and no car lights behind us. I know the road very well, but it was still dicey. The knowledge that we would drop below the snow soon pushed me forward, and I was watching each landmark to measure how far we were from that safe haven. At this point, it was better to continue than go back. And soon we were below the snow, on dark, wet, rainy winter Yosemite roads. On our drive across the pass, we saw no one in front of us or behind us, even after stopping for a few comfort breaks. A few cars passed going the opposite direction, but then all traffic died. We had the road to ourself. 

About an hour later, Flashing Ranger lights greeted us at the Crane Flat gate. We weren’t in trouble. It was just a Ranger closing the road. Eastbound traffic had been closed for some time as evidenced by the lack of cars passing us. And the west bound lane was only open for people to exit the Tioga Road. As my wife looked back, she saw the Ranger close the gate behind us. We were the last car across the pass. 

Sometimes a storm only closes “The Pass” for a few days, but this was not the case in 2016. Once it started snowing that night, it never stopped. The second biggest winter in recorded history was upon the Sierra, that led to over 700 inches of snow in some locations.

I knew something epic was in the making that night, and the experience of being last car across that night is pretty cool. It was certainly memorable, and yes, I heard those Scottish drums from Braveheart driving me on the whole way. 

2016-10-15 17:11:27.088, give or take an hour for DST

Nikon D810, Sigma Art 35mm f1.4, 1/30 sec f/4.0 ISO 800

Newsletter Signup Error Fixed

I just fixed my email newsletter signup widget. Seems one setting was incorrect and that stopped people from subscribing. Give it a try and see if it works so you can get my monthly newsletter. I work to keep each newsletter high signal and low noise so that you want to read it every time. It’s a great way to keep up to date on the blog and on my latest workshops and events. Thanks for subscribing!

Big Winter in Yosemite

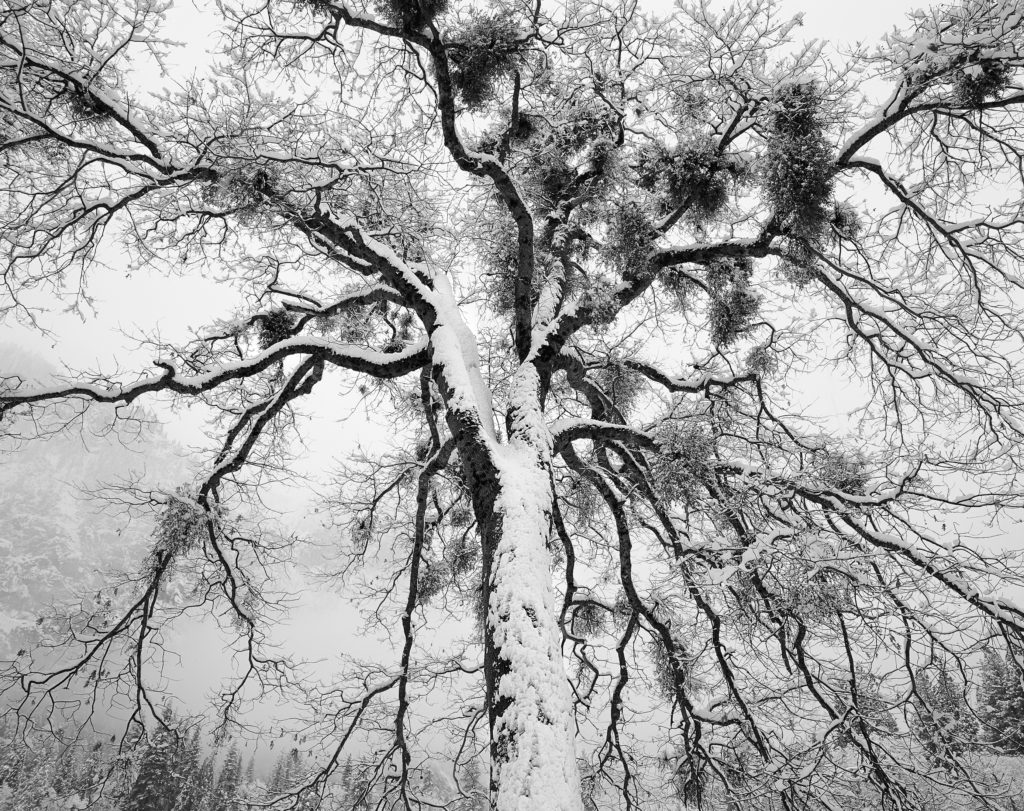
Black Oak, Snow, Cooks Meadow, Yosemite Valley

If you ever want to experience Yosemite in snow, this is a good year to do it. Yosemite is having a “big winter”, and is currently pushing towards 150% of normal snow fall thanks to frequent, and heavy storms. In a normal year, snowfall starts to decline in March, but this weather pattern often keeps snowing into April, and later. I lived in Yosemite Valley during a similar pattern during the winter of 97-98 and it was so cold we had to burn wood, our only source of heat, from October through May. 

The key to photographing Yosemite in snow is to get in the valley BEFORE the storm hits. That’s because there is a peak moment as the storm is clearing, usually the morning after a storm, where the snow is heavy on the trees and beautiful. But as soon as the sun comes out, the snow starts to melt and get ugly. I’ve been told that Ansel Adams wouldn’t even stop for coffee on such mornings, and would be out the door as quick as he could. 

If snow is not your thing, that heavy snowpack is going to lead to some incredible flow in the waterfalls.  With this size snow pack, peak will probably be in May, and warm temperatures may even lead to some flooding, turning the meadows into giant reflecting pools. All spring, the valley will rumble with the thunder of Yosemite Falls. 

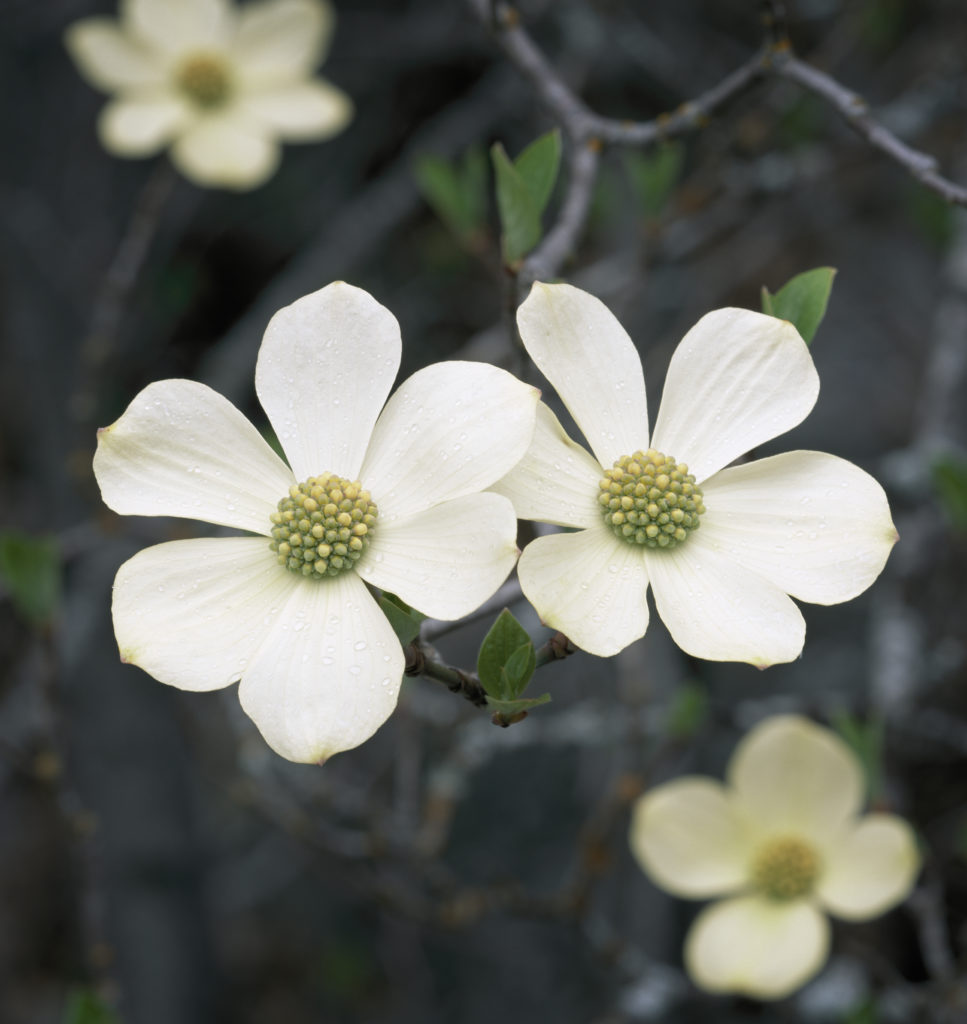
April will have good waterfall activity too, with the added bonus of the dogwood bloom.

Dogwood near Happy Isles, Yosemite Valley

Expect a later opening to the Tioga Pass road…it all depends on how aggressive the current superintendent is about plowing and how long it keeps snowing (avalanche conditions.) 

If you ever needed an excuse to visit Yosemite, this year’s snowfall and waterfalls should be it!

Links:

Yosemite Webcams
Sierra Snow Pack
Weather
Call 209-372-0200 for current road conditions in Yosemite

Inkjet Printing Through Photoshop – Macintosh

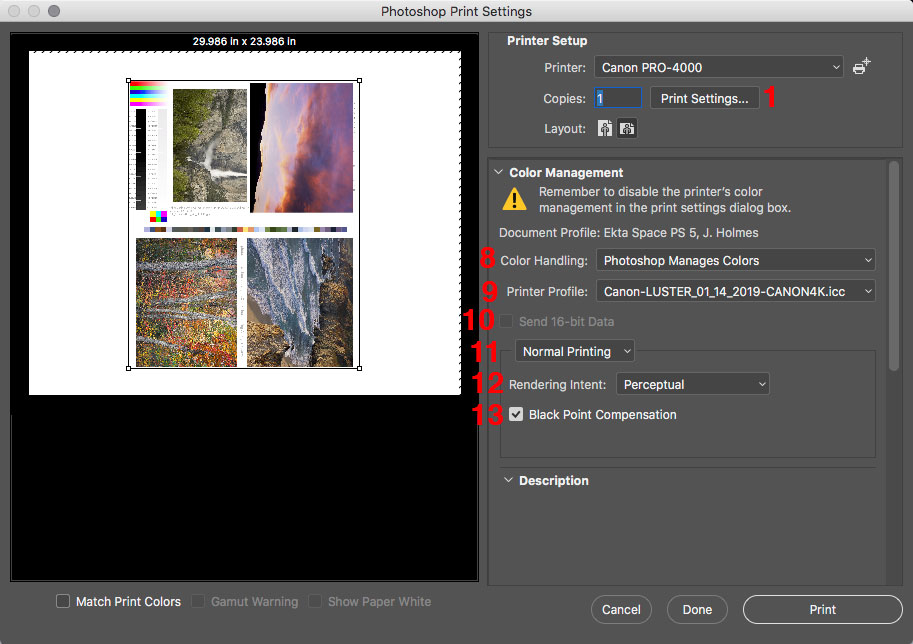
Using printer profiles correctly when printing is essential to getting accurate color from your printer. The challenge is that you have a bunch of settings that have to be set up exactly right, every time, for it to work. That is further complicated because every editing software, OS, and printer driver has it’s own settings and names for those settings.

You’d think that there should be some good information out there on how do do all this, but even the paper manufacturers don’t have good guides. One of my favorite companies has German language screenshots in their English language document, and they note that their instructions don’t work for every setup. Uggg!!!! It makes you want to pull your hair out.

I’m going to make my attempt to solve this problem by sharing the settings I use with Photoshop on the Mac. These settings have been tested and verified to print my Color Test Sheets correctly.

The settings for Lightroom on the Mac are quite similar to these, so you should be able to translate them over. Understanding what each setting does may also help you translate this for other editing programs and setups. As time allows, I plan to make more of these, but the easiest place to start was with the software I print through.

download the PDF here:
Inkjet Printing Through Photoshop – Macintosh.pdf

Clinic – Better Photo Prints through Printer Tuning

Most photographers I talk with are not satisfied with the results from their home inkjet printers. That leads to frustration, and holds many back from a fuller enjoyment of the process of making prints.

If that sounds like where you are at, my April 6 Printer Tuning Clinic is for you. I’ll teach you straightforward solutions that will help you get more quality and consistency out of your printer, how to evaluate canned and custom profiles, and help you set good expectations for accuracy.

The process I’ll show you is the same one I’ve used in my professional printing business. The potential in unlocks in students once they grasp it is incredible.

Reserve your spot today at https://www.eventbrite.com/e/better-photo-prints-through-printer-tuning-tickets-58116173038

8×10 Print Sale

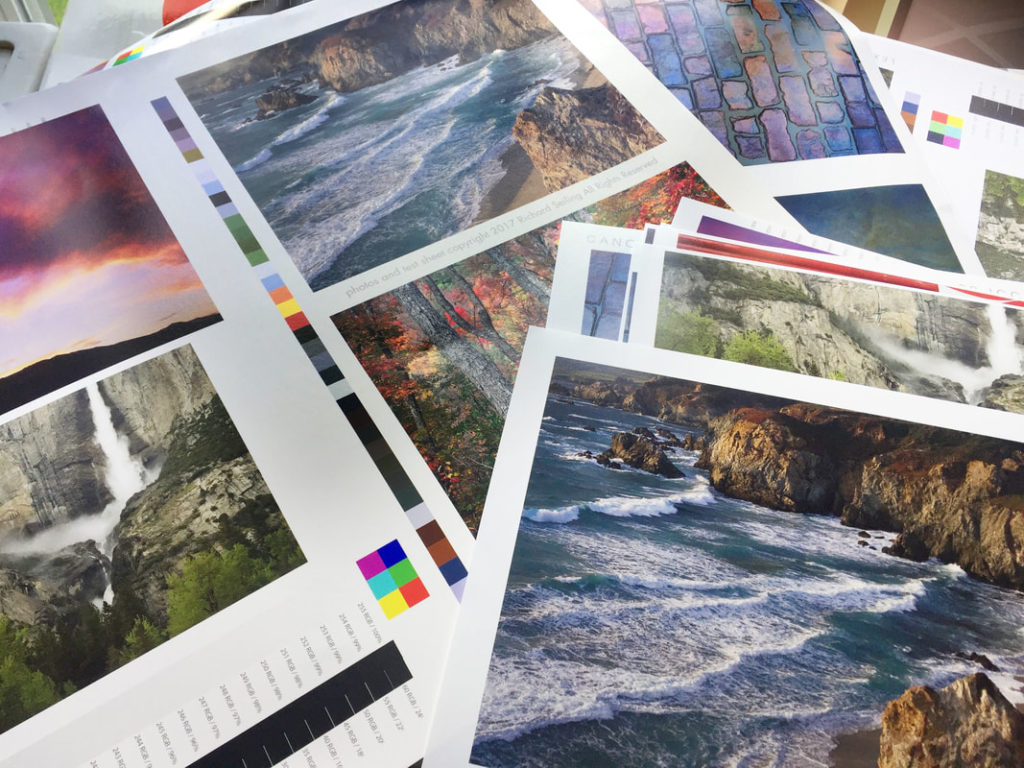
One of the ways I support myself and this blog is through printing for other photographers. I print using the Canon PRO-4000 which produces the finest prints I’ve made, even better than my $129,000 digital enlarger. Through the end of March, I’ll print four of your photos as 8×10 prints on any of my papers for $35 shipped. My printing service is a boutique operation, and each order is printed personally by me, so you can be assured that each print will meet my exacting standards. Go to BespokePrintmaking.com to pick a paper and upload your files.

Photographers You Should Know – Steve Dzerigian

This is my first in a series of features about photographers who have inspired or influenced me, and who I think it’s worth the time to get to know more about.

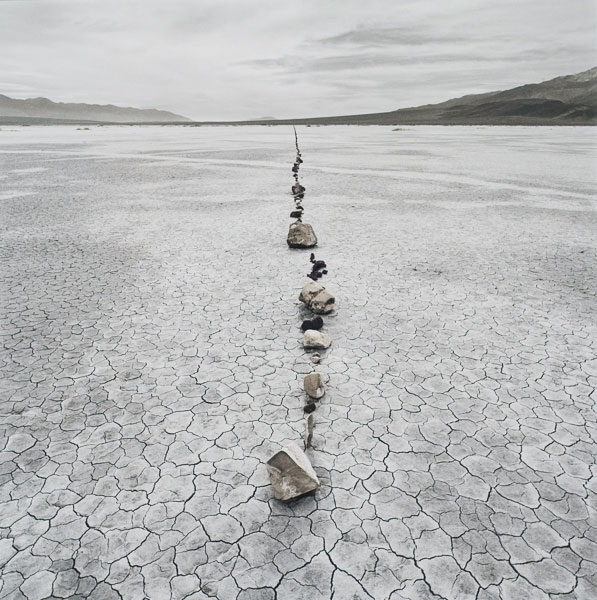
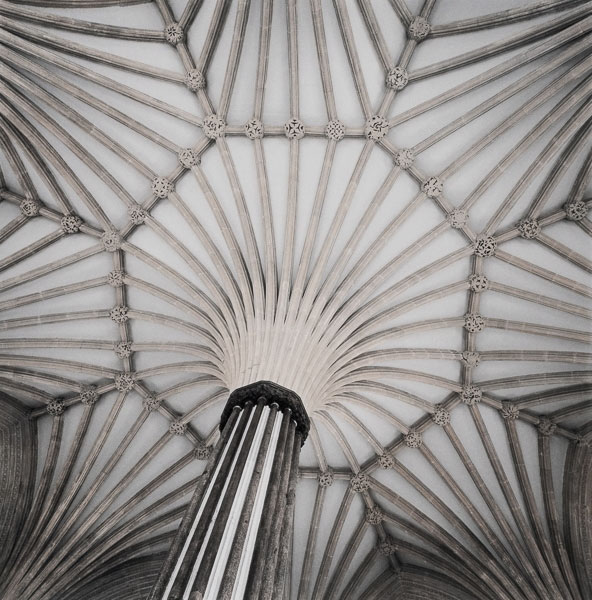
In celebration of his new book Trail of Stones: My Path in Photography, published by The Press at California State University, Fresno, I want to introduce you to Steve Dzerigian.

Dzerigian’s work always captivates me because of the great depth in every photo. Not spatial depth necessarily, but the soulful depth of seeing a place or thing in a way that captivates your imagination, and makes you want to contemplate it more deeply.

Looking at Dzerigian’s work always leaves me challenged to try and see deeper and more clearly in my own work, to be able to speak the volumes he expresses with such elegant simplicity.

A darkroom practitioner, his prints are made in silver gelatin with an occasional addition of delicate hand coloring. Typically of small scale, they are like little gems that hold worlds much larger than their apparent physical size. They are a poignant reminder that our social feeds really don’t do justice to a photograph…you need to get out and look at real prints as often as you can. Prints can show the full depth of an artist and their expression in a way a little 1500 pixel square fails to do.

But Dzerigian’s photos are only part of his story. For many decades he has been a force in Fresno and Yosemite to help inspire and teach other photographers, from working on The Ansel Adams Photography Workshops, to helping found the Spectrum Art Gallery in Fresno, to his many years teaching at Fresno City College. To know Steve is to know the many people he has influenced, inspired, and befriended.

Steve is one of those people that you feel better just for knowing. It seems every time I talk to him, I’m left encouraged and inspired to reach for a higher bar in life, and am always so thankful to have our paths intersect. And that makes me an even bigger fan of his work.

I’ve included a few pieces his work here. His latest exhibition is on display at Spectrum Art Gallery in Fresno March 7-31, 2019 with an artist reception March 7 from 5-8 pm and a live discussion March 22 at 7 pm also at Spectrum. If you can’t make the trip to Fresno, visit his website stevedzerigian.com.