Visualization

Celestial Cascade, Tuolumne River, Yosemite, California
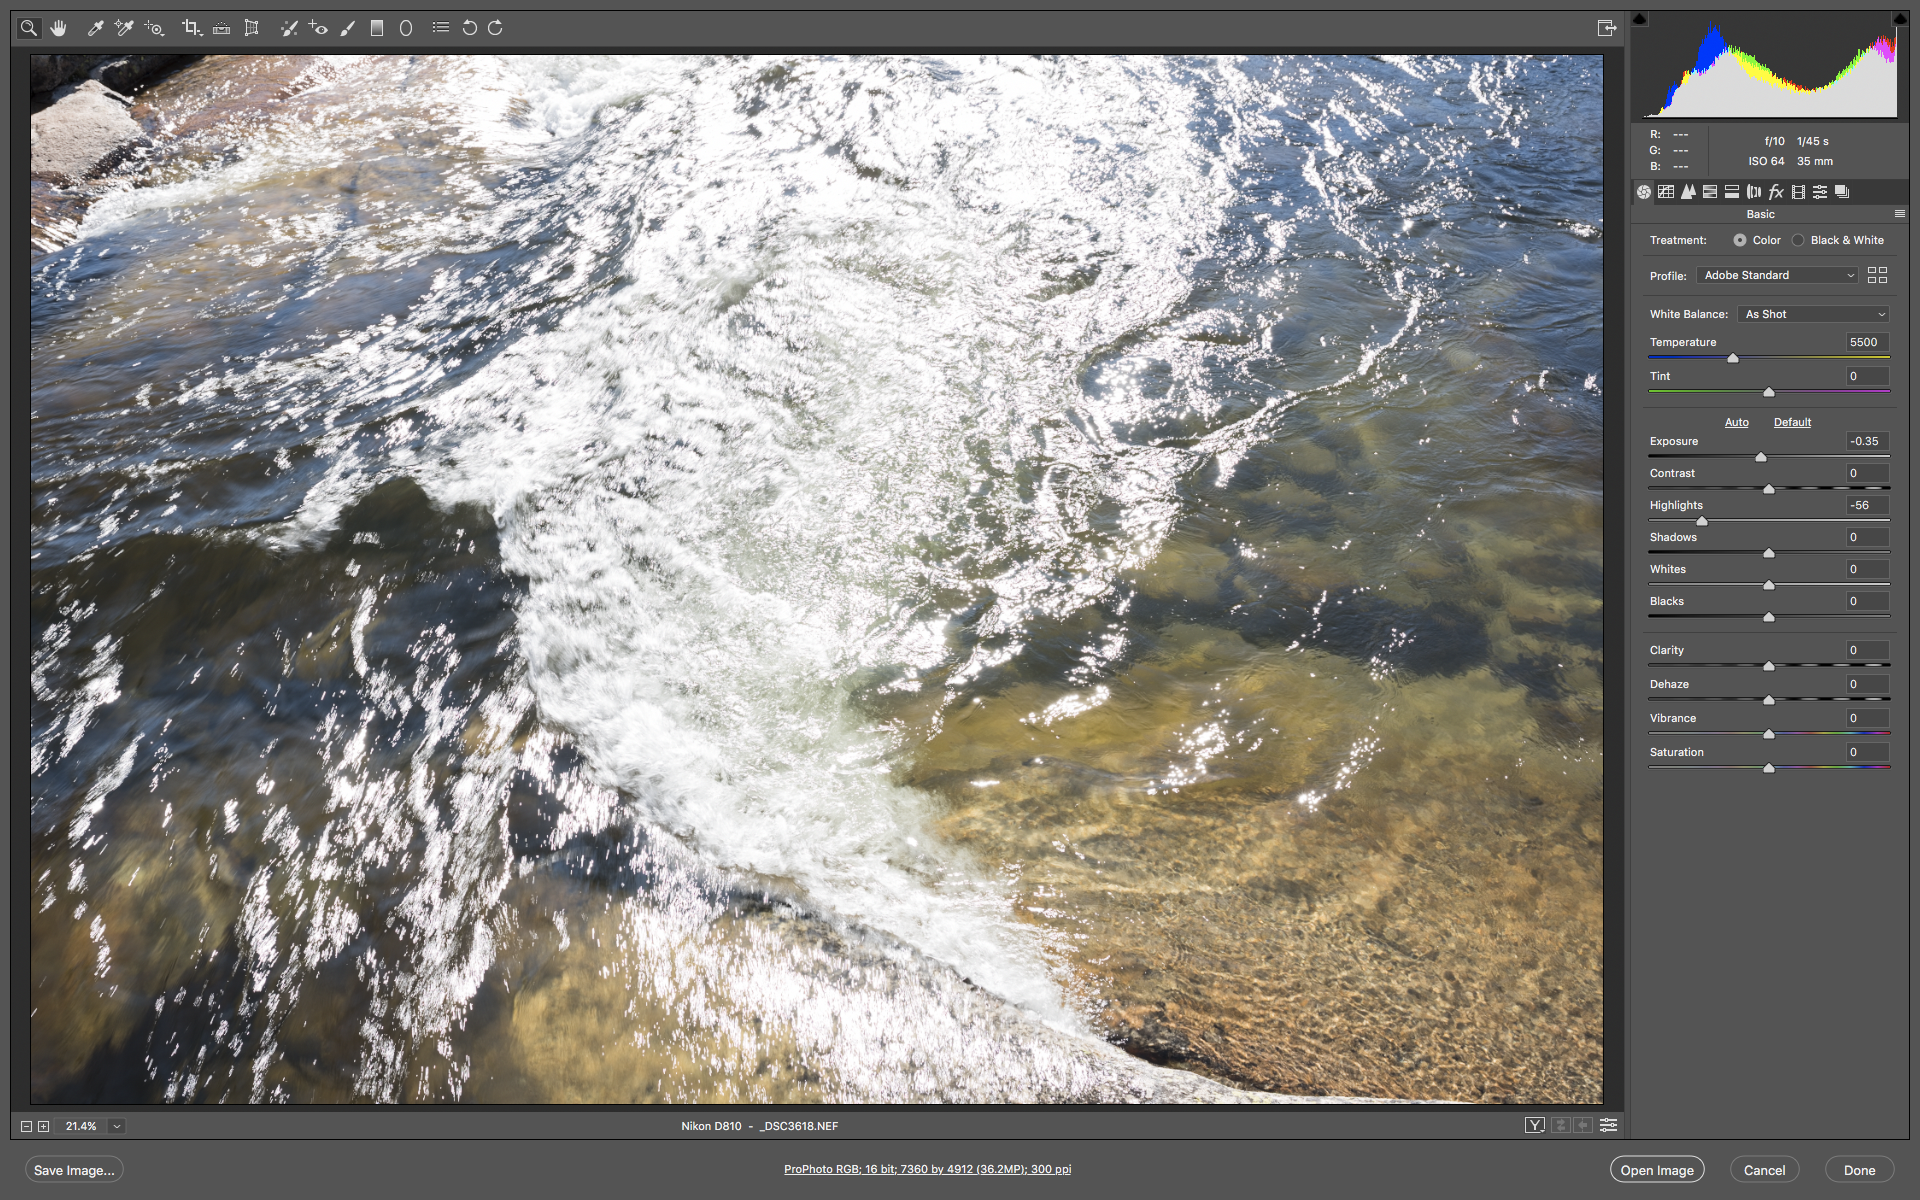
Nikon D810 with Sigma Art 35mm f/1.4
1/45 sec, f/10, ISO 64

Photographs aren’t just about what we see, but about what we feel, what we believe. 

Visualization is one of my most important tools in that lofty goal when I’m trying to “see” and make a photograph.  Put simply, before I even take out the camera, I see in my mind’s eye what I want the final image to look like, and I use that visualization to direct all the creative choices in exposing and processing the photo. 

This may seem unimportant when a digital camera can give us a instant preview after we click the shutter, but visualization goes beyond that. That little camera LCD screen can’t show us all the possible processing choices we might make, nor can it match the range and depth of a final print. The visualization a skilled photographer makes goes way beyond what the camera can display. 

I find this to be particularly true in black and white, and by learning to visualize better, it opens our eyes to new possibilities. It can enable us to “see” better, both what is in front of the camera, and what is in the mind of the photographer. 

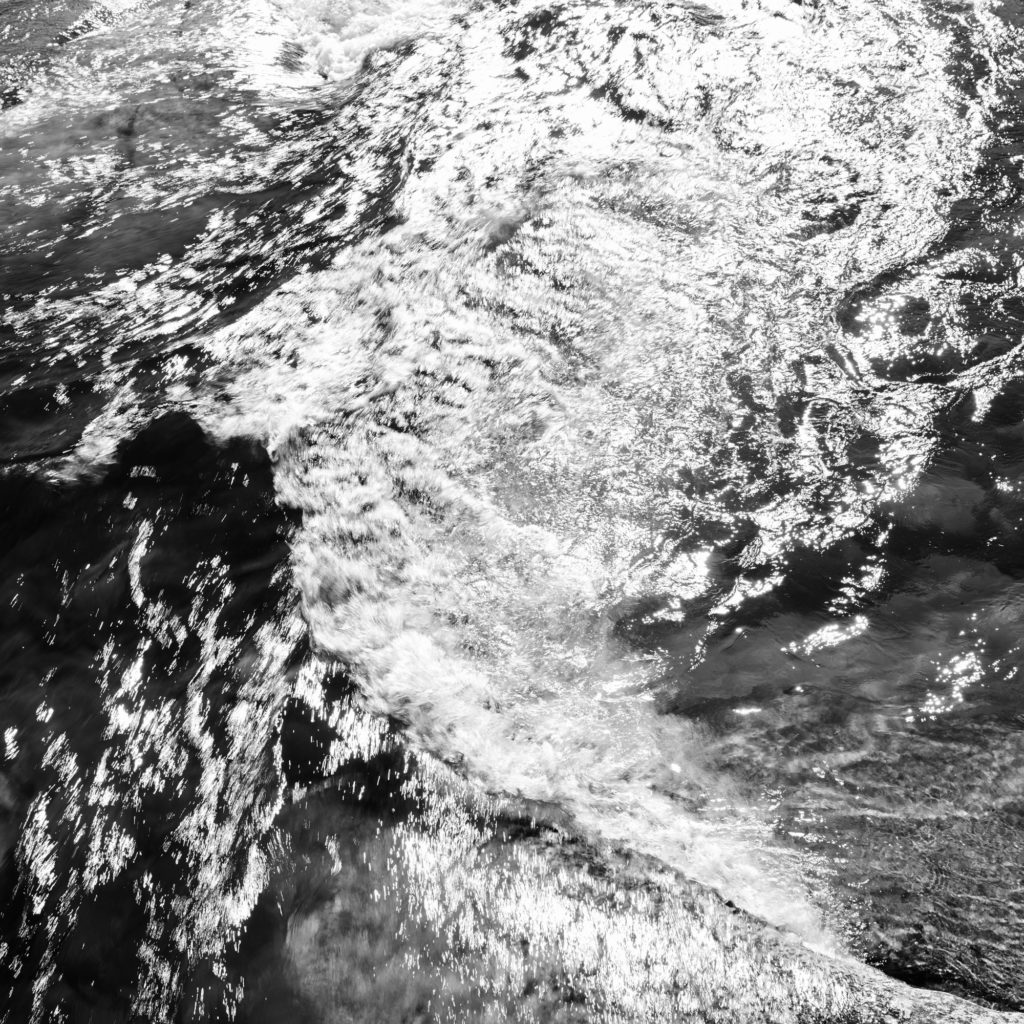
Take for example the photograph above, Celestial Cascade, Tuolumne River, Yosemite, California.   

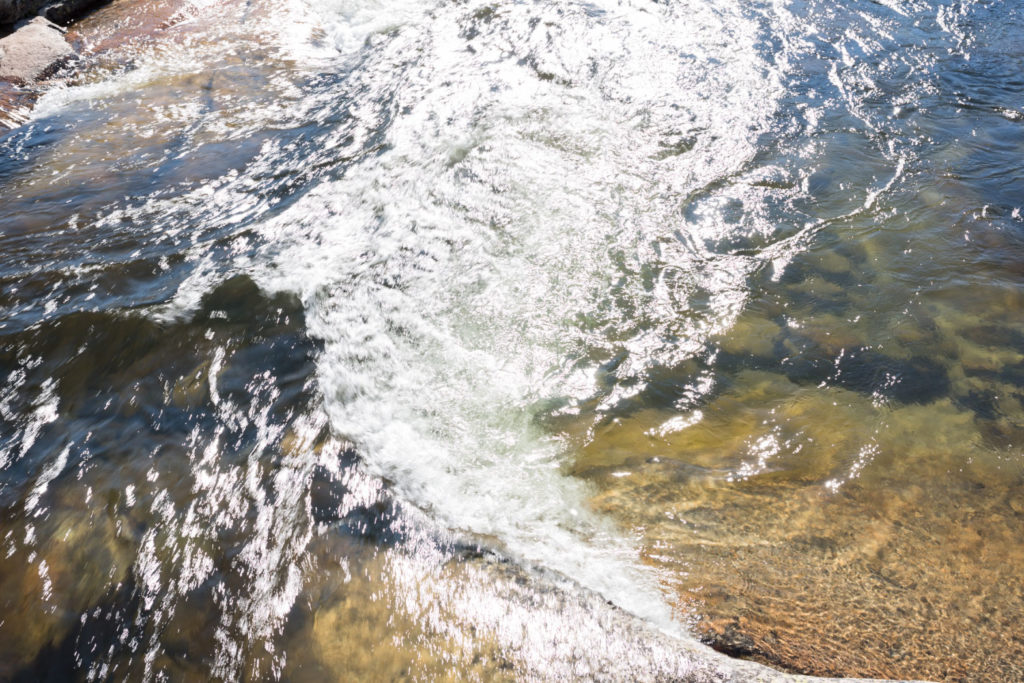
Since this photograph is in black and white, what you see above is not what my eye saw. To the naked eye, it looked like this:

As part of a short hike with my family, we stopped to enjoy a favorite section of river and the coolness of this mountain stream. As my kids played with the rocks and waded, I had a few moments of quiet. The time of day didn’t seem conductive to making photographs, with high sun and contrasty light. But as I watched the water and contemplated the beauty of the scene, I found myself enjoying the patterns made as the water surged under the bridge and built into a wave, with the patterns of white foam it produced, and the play of sunlight reflecting as a million stars on the ever changing surface. The patterns reminded me of my friend David Ashcraft’s photograph “Universe Expanding”, and I knew if I just looked more deeply, I could express what I was seeing and feeling. I wanted to turn this little patch of the Tuolumne river into a proxy for the the infinite sea of stars in the night sky, and into the deeper realities of that infinite nature for which words are hard for me to find. 

At this point, my camera is still in the bag, but my mind is fully awake. The color was not interesting to me, so I decided that this should be in black and white. Once I switched that switch in my mind, things started to become clearer. I wanted the photograph to focus on the water and the patterns of sunlight and motion. Contrast would let me do that, and then all of a sudden, I saw in my mind exactly what I wanted the print to look like. It was at that moment that I went for the camera bag, and worked through the settings that I thought would give me what I saw in my minds eye. I was without a tripod and trying to work more freely, so I had to work within the shutter speeds that would let me hand hold the camera. I wanted some blurring of the water, but the light was so bright that even at ISO 64 and f/10 I was still at 1/45 of a second, but that happened to work out well for what I wanted to show. 

The thing about visualization is that it makes processing easier to a degree because you already know the look you want before you even open the file. That visualization guides your steps and choices of tools. 

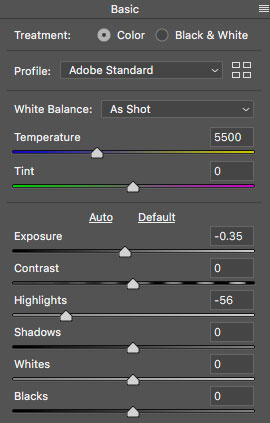
RAW processing was pretty minimal. I just brought down the exposure and the highlights a little to try and hold detail in the foamy water. 

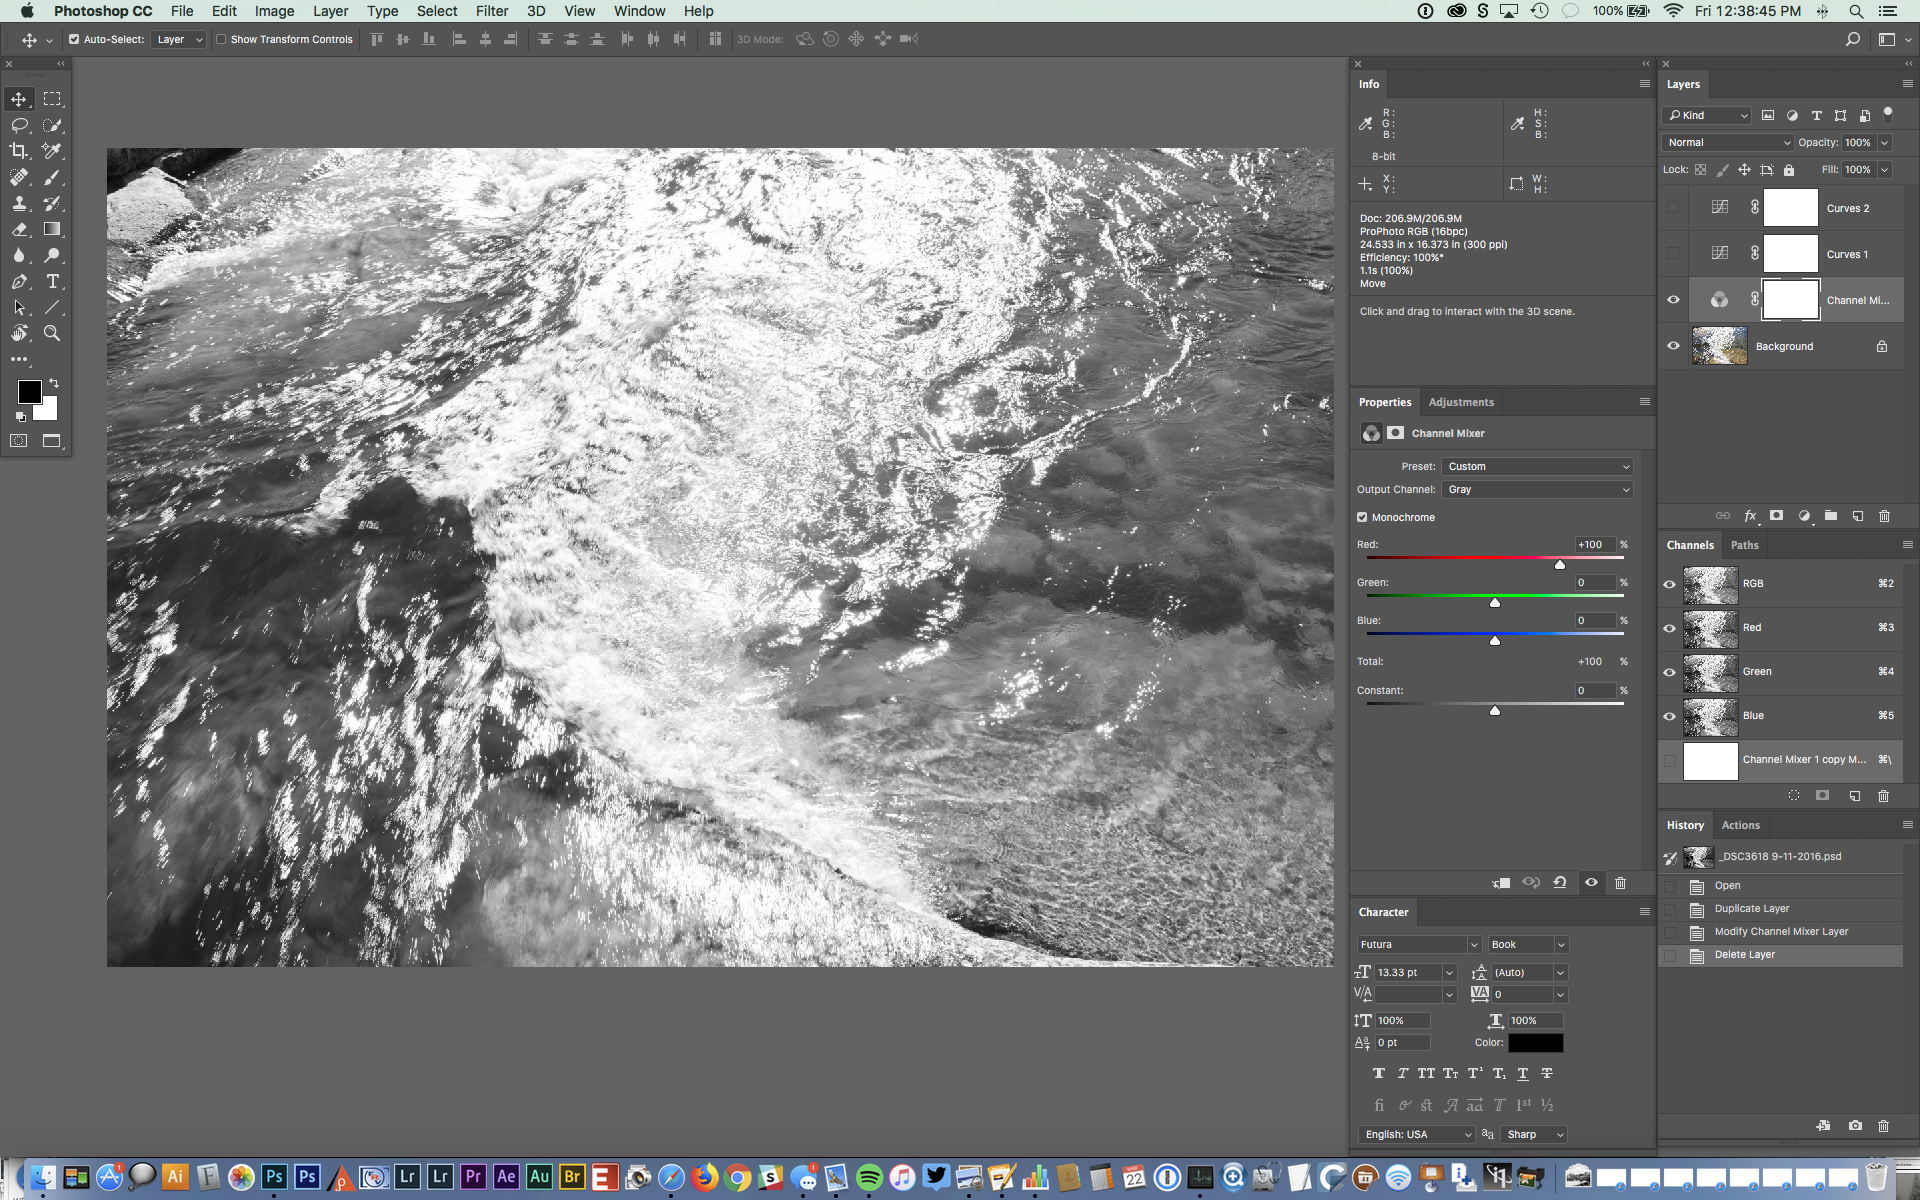
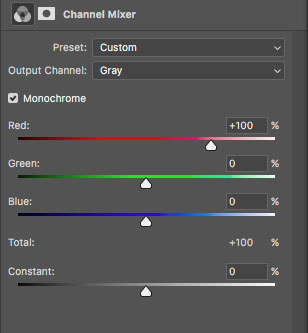
The Photoshop adjustments are all global changes. First I used Channel Mixer to convert the image to black & white using the red channel, as I liked how it allowed some of the shapes of the underlying rocks to come through. 

Then I added a simple one point curve that darkened the image overall, but by the placement of the point, biased that darkening to the shadows and midtones. This is one of the reasons I really like curves. They give me the instantaneous ability to exercise very precise control over how and where changes to density and contrast is applied. Instead of the linear “more or less” of a slider, I can move the points in both the x and y dimensions, as well as decide how many points to use. Points create inflection points that change how the curve works up and down slope, and those inflections are where I find the control to achieve what I envision. 

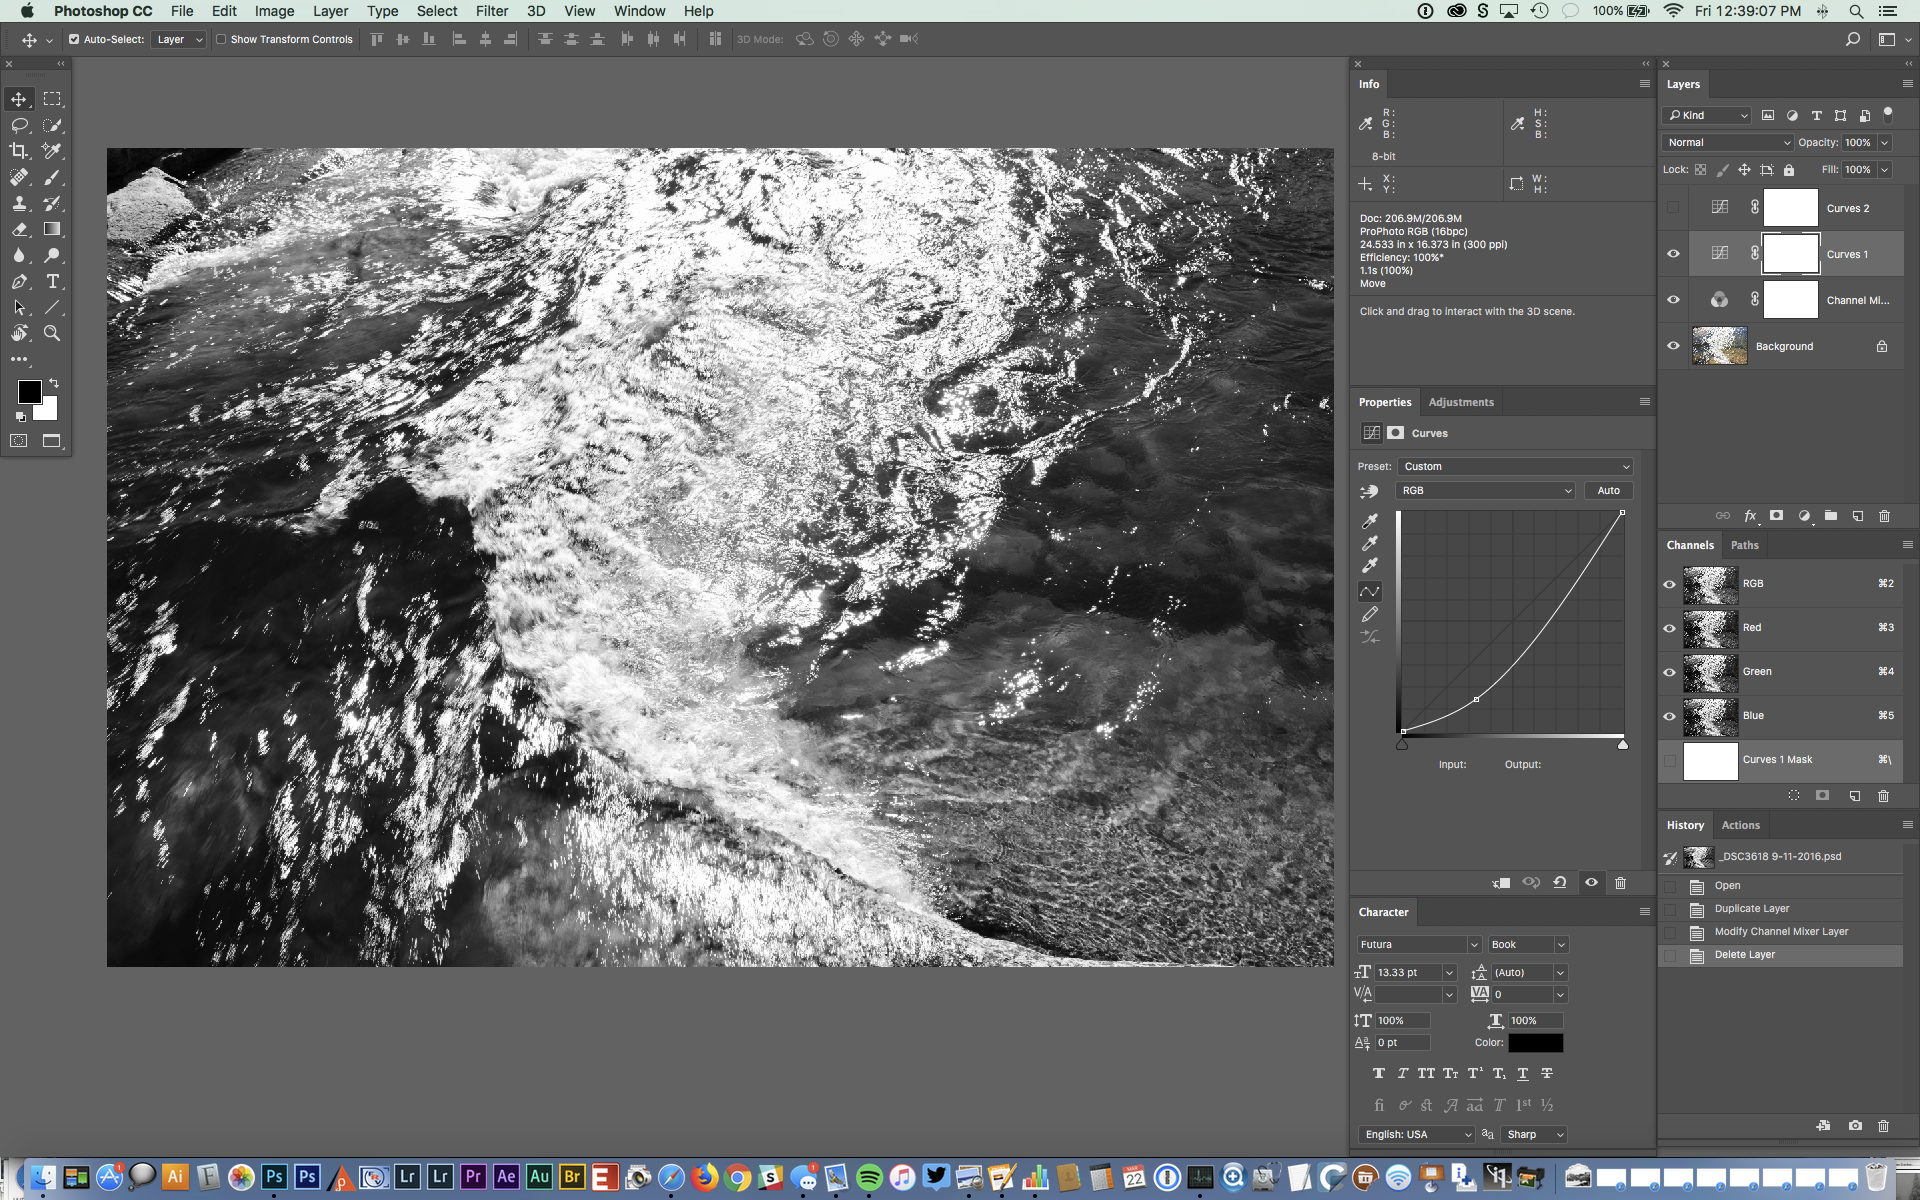
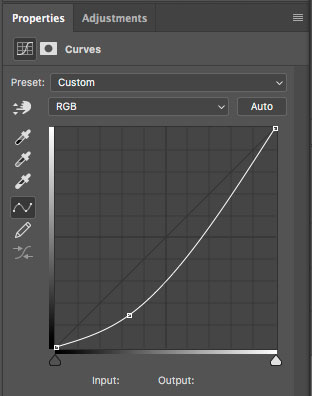
The file shows I played with a second curve as I looked at some alternative tonal relationships, but rejected that for my original curve. 

I want to draw attention to how simple this was to process. A single frame camera exposure, two minor moves in RAW, a simple conversion to black and white, and one curve with one point. This is an exercise in working with the materials, and seeing “through” them to how they can work at their most fundamental level. I’m not opposed to greater complexity in processing, but the more you work “with” the process, the easier making a photograph can become and the more you free your vision. 

My final step for this photo was cropping. Cropping is a creative decision for me, and I usually play with crops on every photographI make in attempt to find the composition that best draws attention to the subject. The goal is to eliminate as much distracting information as possible. Also, I’m not fond of the 2:3 ration, and I prefer the more squarish 4:5, and as well as the 1:1 square. I often find the 2:3 just includes too much and makes it hard to create the tension I like in a composition. 

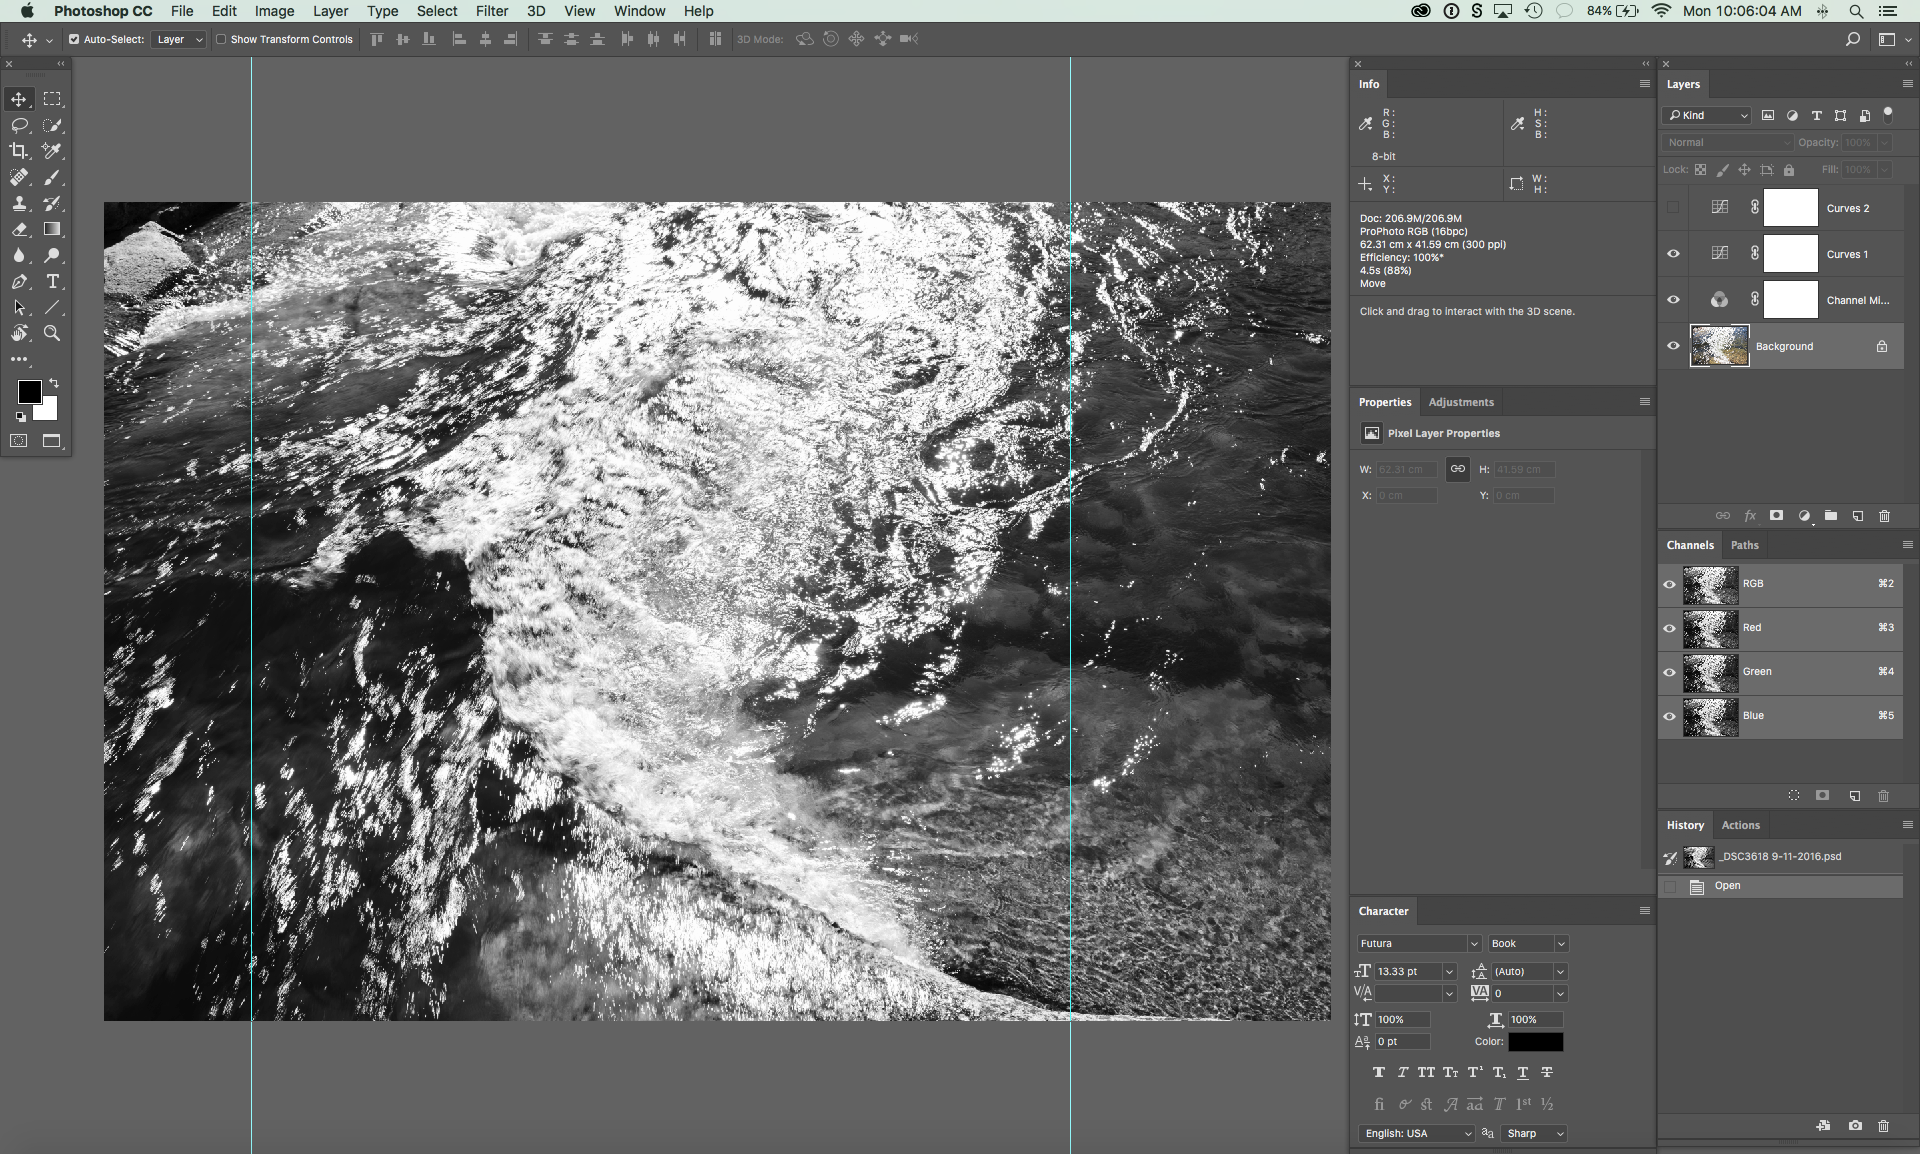
For this photograph I settled on a 1:1 square crop, which I mark using the cyan “guide” lines, which are saved in the file so I know how to crop the Master File when making targeted files for screen or printing. In many things, Photoshop provides multiple paths to the same solution. I’ve been using this for crops since before Photoshop added a way to preserve crops, so it’s what works for me. 

The end result is something I wanted to say, but for which I had no words. Through visualization and applying the craft of photography, I was able to give voice to that vision, and in this case, the result is an expression of something I felt, more than what I saw before the camera.

Last Across the Pass

Tioga Pass, Elevation 9945 feet, Yosemite National Park

Sometimes a few minutes is the difference between a 3 hour drive home or a 9-12 hour trek around an entire mountain range. This October night in 2016, I pushed it right to the edge. 

Yosemite’s Tioga Pass Road, peaking at 9945 feet elevation, provides access to the stunning Eastern Sierra, but can close suddenly during storms. The Yosemite photographers call this gamble “East Side Roulette”, and it’s a game of “will the storm close the pass before I make it home.”

After an exceedingly windy day exploring aspens with my family, the approaching clouds said it was time to go. I swear I heard the drums from the Braveheart soundtrack driving me to hit the road. If we didn’t stop to eat, it would be three long hours before the next food services. My wife wanted to stop and eat at The Mobile Station, but I convinced her to just get our food to go, the urgency of the storm in my head. I munched down my pizza while driving up the steep drop-offs of Tioga Pass to quickly worsening conditions. 

As we reached the top of the pass, the snow was already starting to fall, as you can see in the zoomed in crop. I stopped to make one last picture as the light faded, as I knew some big life changes were coming soon, and I wanted to mark this personally meaningful day at one of my favorite places. 

Faint streaks of spitting snow that would become a giant winter.

We resumed the drive, and snow started to cover the road, with no lines and only one fading set of tire tracks to follow, and no car lights behind us. I know the road very well, but it was still dicey. The knowledge that we would drop below the snow soon pushed me forward, and I was watching each landmark to measure how far we were from that safe haven. At this point, it was better to continue than go back. And soon we were below the snow, on dark, wet, rainy winter Yosemite roads. On our drive across the pass, we saw no one in front of us or behind us, even after stopping for a few comfort breaks. A few cars passed going the opposite direction, but then all traffic died. We had the road to ourself. 

About an hour later, Flashing Ranger lights greeted us at the Crane Flat gate. We weren’t in trouble. It was just a Ranger closing the road. Eastbound traffic had been closed for some time as evidenced by the lack of cars passing us. And the west bound lane was only open for people to exit the Tioga Road. As my wife looked back, she saw the Ranger close the gate behind us. We were the last car across the pass. 

Sometimes a storm only closes “The Pass” for a few days, but this was not the case in 2016. Once it started snowing that night, it never stopped. The second biggest winter in recorded history was upon the Sierra, that led to over 700 inches of snow in some locations.

I knew something epic was in the making that night, and the experience of being last car across that night is pretty cool. It was certainly memorable, and yes, I heard those Scottish drums from Braveheart driving me on the whole way. 

2016-10-15 17:11:27.088, give or take an hour for DST

Nikon D810, Sigma Art 35mm f1.4, 1/30 sec f/4.0 ISO 800

Big Winter in Yosemite

Black Oak, Snow, Cooks Meadow, Yosemite Valley

If you ever want to experience Yosemite in snow, this is a good year to do it. Yosemite is having a “big winter”, and is currently pushing towards 150% of normal snow fall thanks to frequent, and heavy storms. In a normal year, snowfall starts to decline in March, but this weather pattern often keeps snowing into April, and later. I lived in Yosemite Valley during a similar pattern during the winter of 97-98 and it was so cold we had to burn wood, our only source of heat, from October through May. 

The key to photographing Yosemite in snow is to get in the valley BEFORE the storm hits. That’s because there is a peak moment as the storm is clearing, usually the morning after a storm, where the snow is heavy on the trees and beautiful. But as soon as the sun comes out, the snow starts to melt and get ugly. I’ve been told that Ansel Adams wouldn’t even stop for coffee on such mornings, and would be out the door as quick as he could. 

If snow is not your thing, that heavy snowpack is going to lead to some incredible flow in the waterfalls.  With this size snow pack, peak will probably be in May, and warm temperatures may even lead to some flooding, turning the meadows into giant reflecting pools. All spring, the valley will rumble with the thunder of Yosemite Falls. 

April will have good waterfall activity too, with the added bonus of the dogwood bloom.

Dogwood near Happy Isles, Yosemite Valley

Expect a later opening to the Tioga Pass road…it all depends on how aggressive the current superintendent is about plowing and how long it keeps snowing (avalanche conditions.) 

If you ever needed an excuse to visit Yosemite, this year’s snowfall and waterfalls should be it!

Links:

Yosemite Webcams
Sierra Snow Pack
Weather
Call 209-372-0200 for current road conditions in Yosemite

Ansel Adams Books

Few people have had such a sweeping impact on an art as Ansel Adams continues to have on photography. He helped make photography acceptable as a fine art, and even today, he is the best selling photographer at the annual art auction. But one of the things that makes Ansel most unique is his lifelong effort to teach photography and improve the understanding of the medium. His Zone System has helped countless photographers gain control over exposure, development, and printing, and still has relevancy in the digital age.

I think there is much to be learned by reading Ansel’s books and studying his methods. I’ve been a student of Ansel since I first discovered him as a eager, but inexperienced seventeen year old. In Ansel’s books, I found answers I couldn’t find in the dozens and dozens of other books I had read. In my early years, I devoured Ansel’s books as I attempted to improve my craft, and started a journey that lead me to a stint working at the Ansel Adams Gallery in Yosemite, and the chance to meet many of the people who worked with him and whom he influenced.

His way of approaching the making of a photograph has had a profound effect on me, and I still find directly applicable to digital cameras today. So I’ve compiled a list of his books that I think will help give insight into the photographic process. While Ansel’s books are primarily about black & white (please don’t call it monochrome), the though process of making a print is equally applicable to color.


Examples: The Making of 40 Photographs
Detailed notes on the controls Ansel applied at printing to create the final piece. How he selectively lightened and darkened, controlled contrast, and more. As interesting as the technical part is, the insight into is though process, how he “saw” and pre-visualised the results is arguably of even greater valuable.

The Print
Book three of Ansel’s three part instructional series on the Zone System, The Print focuses on everything related to the printing process. The insight in to how to approach the challenges of adjusting contrast and image density both global and locally through dodging & burning is as applicable to digital processing as it is to darkroom work.

The Negative
Valuable insight into the Zone System which describes the series of shades in a photograph from black to white as Zones that can be pre-visualised to better control exposure.

The Camera
Fundamentals of how to “see” with different focal length lenses. How wide angle and telephoto lenses change the perspective on a subject, and so much more fundamental information on how cameras and lenses work.

Yosemite and the Range of Light
Ansel’s Magnum Opus, reflecting his life long relationship with Yosemite and the High Sierra. One of my favorite coffee table books, and still an inspiration.