Too Many Backups! Here is how I consolidated my old archives.

What do you do when you have too many backups? That’s a problem I’ve been working on for the past two years and I thought it might be valuable to put some of this in an article for others who face similar problems. 

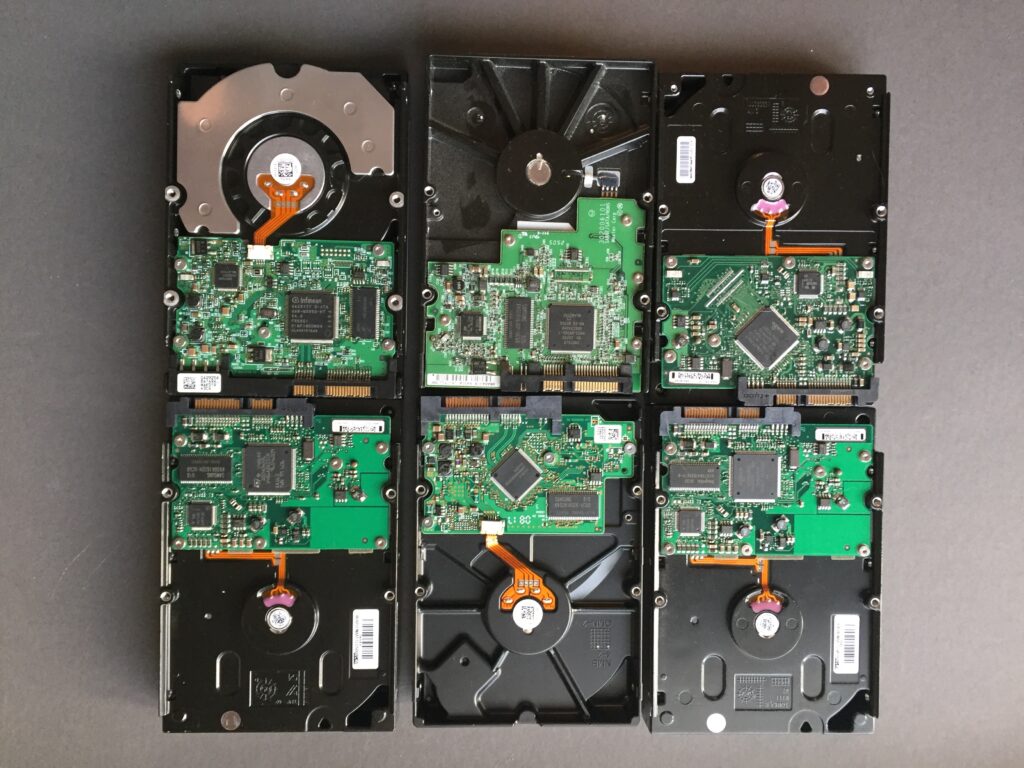
First of all, how many backups is too many? For me it was when I started stacking backup hard drives like cord wood. Since I started making 300mb film scans in the late 1990s, I’ve had a series of larger drives holding my files. When I upgraded to a larger hard drive, I always kept the old drive “just in case”. This has led to a lot of drives. Just this week I found four drives I didn’t even remember I had, all from the 2007-2009 time frame. Last week I pulled files from some truly ancient drives that I hadn’t spun up in about 15 years. 

Why did I keep all these drives? I wanted to preserve the ability to go back in time in case I found a file had been corrupted at some point. The only way to fix a corrupted file is to go back in time before it got corrupted and pull that file. That is the purpose these drives served. 

Having ten or fifteen ancient drives taking up space consolidated on one large drive seemed like a better option, and would help me reduce some of my ever growing clutter. 

Adding to my problem of excess backups is how Carbon Copy Cloner (my backup software of choice), backs up files. CCC works in a very simplistic way that is very safe, but in doing so, it is easy to make duplicate files when you move folders around. So on top of my duplicate “archive” drives, I had several terabytes of CCC files to deal with. 

My goal for this project was three fold. First, I wanted to consolidate all my archives on one drive. Second, I wanted to deduplicate (dedupe) those files to remove unnecessary duplicates so that it would take up the least space possible. Third, I needed to do all this in a way that ensured that I precisely copied every file, bit for bit, and that any duplicates were truly duplicates with no differences at the bit level. 

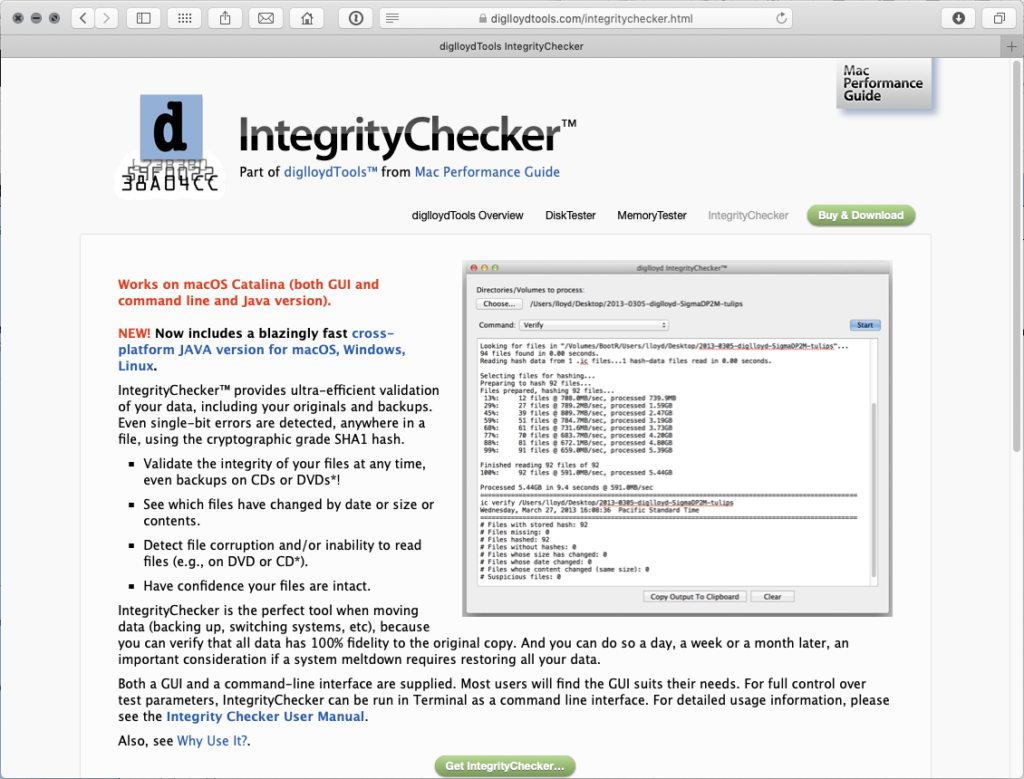
The tool that has made this possible is IntegrityChecker from Lloyd Chambers at https://diglloydtools.com and diglloyd.com. 

IntegrityChecker does a number of very interesting things. Foremost, it will compute a cryptographic hash for every file on a drive. This hash serves as a checksum that can show if a file has been altered in even the slightest way, down to the bit level. This is very useful when copying files to another drive to ensure they copied exactly. It also lets me compare them to the hash at a later date to detect corruption. It does some other cool things too as I’ll explain in a moment. 

Consolidation

So my consolidation process looked like this. 

  1. Use Carbon Copy Cloner to copy from my old drive to a folder on a new drive. 

2. Use IntegrityChecker to compute hashes for both copies

3. Use the “compare” function of IntegrityChecker to compare the copy to the original. 

This process let me make a copy of the old drives with absolute assurance that I had copied every file correctly.  In over 20TB of files copied for this project, I only found one file that did not copy correctly for whatever reason. Not bad for pulling data off vintage hard drives. 

Deduplication

Goal two was to dedupe the drive where I had consolidated all my archives and backups. IntegrityChecker helped with this too. IC can use the hashes it creates to look for duplicates. If a pair of hashes matches, you can be sure with a extremely high level of confidence that these two files are exactly the same. This is a much better way to identify duplicates than other methods that rely on file size, name, and date, because those values will not detect bit level differences from file corruption. IC can, so if IC says two files are duplicates, they really are. 

IntegrityChecker lets you deal with dupes in two ways. First, you can use a unique feature of drives formatted with APFS on Macs to create a clone. When a close is made, the two files will be reduced to one at the disk level but you will still see two files in the finder. If you open one of these files and modify it, it will become a separate copy again. Cloning files allows you do reclaim disk space from duplicates without messing up your directory structure. This is very safe, but would not help me with some of my other goals as you will see. 

I decided to go a more aggressive route. I wanted to remove every duplicate file, so I used the  “- – emit rm” command to create a list of duplicate files with the command line code  to erase them. This would remove them from the hard drive permanently, leaving only one copy.

Distillation

As part of this process, I realized I could delete any of the consolidated files that were part of my current, up to date, working drive and backups. After all, I didn’t need copies of files in my master working archive, so why not get read of those too?

To do that, I made a copy of the files from my current “master” drive (the drive where I access my photos when I’m working on them) and copy them to the drive I was using for consolidation. I put this them in a folder labeled “a” and put the old backup copies into a folder named “z” because I learned that IntegrityChecker will use the top most directory to decide which duplicate to keep. By doing this, I could make IntegrityChecker delete the old files that matched my current files. And at the end of the process, I could delete folder “a”, and be left with only the files that did not exist on my current master drive. 

This project let me distill terabytes of files down to about 300GB, which is a very manageable size to keep and maintain.  I consider it a success to be able to get a dozen or so hard drives out of my life and my space for the effort while ensuring that I have an absolutely exact copy of every one of my files. 

This process has worked for me but be forewarned. IntegrityChecker is very powerful, and it is very easy to delete files you don’t intend to. You need to take the time to learn how it works and understand its behavior. I did a lot of testing to practice and understand it, and I am careful to think through the plan every time I use it, in addition to working when I have a clear mind (always a good idea when doing big things with your data!) 

If you have the same problems I do, I hope this gives you some ideas for how to solve it. Courteous questions always welcome. 

Canon Printer Overview – November 2020

For those who want to print at home, Canon has updated their desktop size professional/fine art inkjet printers recently. The new PIXMA PRO-200 and imagePROGRAPF PRO-300 provide much needed updates, as the PRO-100 was getting quite dated given the state of the art of inkjet printing in 2020. 

If you are thinking about buying a printer, I’m going to walk through the current Cannon offerings with my thoughts on the advantages of each. 

PIXMA PRO-200 – 13 inch wide prints  MSRP $699

This is the “entry level” printer for 13” wide making photo quality prints. It offers two shades of gray ink which I consider necessary for pleasing black and white prints. I’ve not printed with this printer, but I suspect it will offer higher quality than the PRO-100 which I believe was introduced in 2012 which is a lifetime ago in inkjet printing. But you should note that this printer uses dye based inks, which typically are not as fade resistant as pigment inks.

At the lower end of their range, Canon limits the features you get, as you’ll see when we look at the features of the more expensive models in their lineup, so you aren’t going to get everything unless you are willing to pay for it. Even so, this printer sits nicely at the bottom of Canon’s line with good features for the price slot it occupies

Buy on Amazon.

imagePROGRAPF PRO-300 – 13 inch wide prints MSRP $899

The PRO-300 offers a different mix of options than the PRO-200.  Some are upgrades, but some I’d consider downgrades. 

Let’s start with the upgrades. First, you get a Matte Black ink which will give you better results on artist papers like Hahnemühle Photo Rag. Better black improve print quality, so this is a big advantage if you regularly print on artist papers. 

Second is the addition of a red ink. My experience is that this offers a meaningful increase in the ability to reproduce the stunning reds in your photographs, and the reason you should be using the ProPhoto colorspace when editing your files (never use AdobeRGB or sRGB when editing or for “Master” files because they severely compromise the reds in your file.) 

Third is the addition of the Chroma Optimizer that is found in their larger printers. The Chroma Optimizer puts a clear coat over the ink that helps produce a smooth surface on glossy and semi-gloss papers which Canon says results in in more evenly reflected light that gives richer blacks, more vivid colors, and less bronzing. From what I’ve seen, these claims are true, and that gives the PRO-300 another advantage. 

But there is always a catch, right? Adding these extra inks means you give up the light gray ink found in the higher end models (and even the Pro-100.) I do a lot of black and white printing, so I don’t like that at all because it means the lightest, most delicate highlights now need to be made from gray ink which will most likely have visible dots and not achieve the delicate tones possible using a third lighter gray ink. That’s a frustrating choice to have to make, and for me, that makes this printer a pass, but if you only occasionally do B&W, it may not be an issue for you. 

I’m also pretty sure this is the “least expensive” printer in the Canon lineup that uses the LUCIA PRO pigment inks. Typically pigment inks last longer than dye inks, so if you are looking to make long lasting prints, you should take that into consideration. 

imagePROGRAPF PRO-1000 – 17 inch wide prints MSRP $1299

The Pro-1000 is the entry level step into the highest quality Canon offers with 11 ink color of its LUCIA PRO pigment inks including Matte Black, Gray, PhotoGray (light Gray), Blue, and Red as well as the ChromaOptimizer. This is the same inkset found in PRO-2100/4100/6000 printers. I’ve owned this printer and can confirm I was able to match the prints from my larger PRO-4000 printer. This ink-set is capable of producing beyond lab quality prints, unless your lab is using this same printer.

My experience as of November 2020 is that this inkset produces the most brilliant digital prints of any process I’ve seen, so much so that it has changed the way I look at my photographs, and allows me to push my printing to new heights. This due in large part to the incredible blacks (d-max) the inks achieve, which give prints more depth and dimensionality. It’s a big upgrade even over the Canon 8400 printers I have previously used. Canon made a big leap forward with this inkset, and changed photography in the process because it literally makes my old prints look dated when compared side by side to the new inkset.

Another advantage is obviously the ability to print to 17 inches wide, which allows for prints to 17×22 inches. For many photographers, this lets them print most of their work in house, so a lab only needs to be used when making larger prints. 

You also get to use larger ink cartridges which is an advantage if you are printing a lot. Canon ink costs a little more per ml than Epson inks, but my experience is that Canon printers use less ink than Epson so I think it evens out in the end on cost. 

The drawback for me is no roll feeder. You have more paper options when printing on rolls, that feature is going to cost you more. Probably not something that affects most photographers, but one that factors in for me. 

Buy on Amazon.

imagePROGRAPF PRO-2000, PRO-4000, PRO-2100, PRO-4100, PRO-6000

I really can’t say enough about these printers. With them, I am making the best prints in my 20+ years of digital printing, prints that have impressed the very discerning pros I work with. The black ink took a generational leap ahead of Epson, but Epson is catching up (competition is a great thing for us photographers!)

These models allow you to print in 24 inch, 44 inch and 60 inch print widths that allow you to print almost anything you can imaging.

The advantage to these printers is the size you can print. The disadvantage is the size they take up. Not everyone has the room for one of these outside a professional environment, or a frequent enough need for larger prints. 

These models all use same eleven LUCIA PRO pigment inks found in the PRO-1000 so you get the same quality.

A printer this large is a multi year investment, and you really should do the ROI on it and make sure you need it so it doesn’t just sit there and collect dust.  If you can make it pencil out, wow, what an amazing tool it is to have. If you can’t, consider the PRO-1000 instead. 

I highly recommend buying the extended maintenance contract Canon offers, which gives you a layer of insurance that the printer will be a useable tool for the life of the contract. 

These printers are really “disposable” items in that they can cost as much to fix as buying a new printer. You need to buy it with that mindset, and not think of it as a lifelong investment. If that ROI doesn’t work, DON’T BUY IT! 

Final Thoughts

I’ve listed the MSRP for these printers, but you should never pay full retail on a printer. Canon and Epson are always offering insane sales and rebates. The rebates cycle every month or tow, and even cycle between vendors. But a little patience can save you hundreds or thousands of dollars. 

New printers don’t have discounts immediately, so there is a price for getting a printer immediately after it’s introduced. Do your research, determine your needs, and decide waiting is worth it or not. 

You should also look at extended maintenance or warranty options. Printers are very expensive to repair when they break, so much so it’s sometimes less expensive to just buy a new printer. Canon offers maintenance contracts on many of their printers, which act as insurance to guarantee your printer will work when it’s under contract. For desktop printers, you may have to look at third party insurance offers by some vendors like Amazon. Printers are not an investment, they are an expense that allows you to use it for a certain amount of time until it either dies or is rendered obsolete. It may last two years or ten, but it’s a gamble every time, so protect your bet as best you can and make sure the cost fits your business model or need. 

My hard drives didn’t let me down!

This is a follow up to my April project to check the integrity of my backups as I was moving my files to a larger hard drive. 

My objective was to make sure that every single file (about one million) copied exactly to the new drive, and that there were no errors that would prevent me from accessing my data. 

To do this I used a software app from Lloyd Chambers called Integrity Checker which is the most efficient tool I’ve found for this unique job. It’s a command line tool that uses the Mac terminal. That in itself was a learning experience as previously I’ve been very afraid of how bad the wrong command in terminal could muck things up. 

Thanks to Integrity Checker, I was able to confirm that my two main backup copies are exact duplicates of the “master” hard drive. That’s a very good thing because it means I really do have a useable backup when my main drive fails. (All drives fail, it’s just a matter of when.)

My secondary objective was to verify some bare drives I was using in the past for backups. I had stopped using them because the were throwing errors in CarbonCopyCloner. I suspected that these errors were due to the drive dock I was using them in, but had no way to be sure, so I didn’t trust them. They got shoved into a drawer and were just sitting there as “worst case” backups as a hail Mary play in case I needed it if things every got really ugly.

To try and bring these orphaned drives back into my active backup,  I put them into a known good drive enclosure. Then, using Integrity Checker, I was able verify that every file on them matches my “master” and that the drives are trustworthy. That gives me confidence to use them again for backing up new data, and lets them be useful as part of my backup strategy.

The one thing that has surprised me as I completed this project is that everything actually worked. Terabytes upon terabytes of data and multiple copies of a million files that were hashed and read multiple times, and it all worked. Even digital photos from the mid 1990s were still there and readable. I think I found a dozen files that threw an error, but they were all readable so the error was insignificant and they were mostly XMP files. That has made me much more trusting of the process used to backup my data. A sigh of relief, but I’ll still remain vigilant. 

Another surprise was how many files I had duplicated on the drives. For a myriad of reasons, I had multiple folders with the same files that built up over the last twenty-ish years of managing my archive. One terabyte of duplicates to be precise.  It would be a nightmare to reconcile all those files manually, but Integrity Checker came to the rescue again. One of it’s functions allows you to identify duplicate files…that’s how I discovered the 1 TB of duplicates in the first place. 

But just as valuable was Integrity Checker’s ability to “clone” the duplicates and regain that wasted space if you are using a APFS formatted drive. 

APFS is a format for storage drives used with a Mac. It’s designed for solid state drives, not spinning disks. It will work with a spinning hard drive, but it can cause a slowdown in transfer speed. That’s something I could tolerate for backups if it let me get back a terabyte of space, so one by one I converted my backups to APFS, re-verified that all the files would read back correctly, then used Integrity Checker to “de-dupe” the drives and reclaim that 1 TB of space back.

The unexpected benefit of this de-duping is that I now have a whole new set of tricks up my sleeve to manage my storage more efficiently.

The end result is that I now know that every copy of my data is good, and I know how to check it as I go forward to ensure it stays good. This gives me more  confidence that my files will be there when I need them, which was the whole point of this adventure…and something I wish I had done a lot sooner. 

My next adventure is to take one of my offsite backups into the cloud using a Synology DiskStation and Backblaze cloud…more on that in a future post. 

Until then, keep backing up those bits!

Accurate lighting for film scanning

Using DLSRs as a scanner to digitize film has become a thing lately, and something I’ve been actively researching as I still have a sizable archive of film with plans to keep shooting B&W. One of the things you need to make good scans is a good light source. Most light sources do not illuminate across the full visible spectrum, which means that colors in your film may not show up in your scans. So I was really excited to discover Negative Supply offers a 99 CRI light source for scanning, and it’s made my wish list for a new scanning setup. I’m not expecting DSLR scanning to match a Tango drum scan, but I’d like to get the most out of the process and this will be a key component for color scanning.

File Backups – Checking for Copy Errors

One of my “safer at home” projects is updating my file storage system. The drive I put new camera captures on was getting close to filling up, so I needed to expand my system by purchasing a 8TB Seagate external drive that could hold the contents of a partially full 6TB drive, along with the contents of a partially full 2TB drive.

It took me many hours of copying with CarbonCopyCloner to transfer the files from both drives to the new 8TB drive, which always tests my patience, and my tendency to want to watch the pot to see if it’s boiled.

With the copy complete, the next to do is a major reorganization of my folder structure to better fit my current needs and to work with my backup scheme. As part of this, I’m going to erase and reuse some older backup drives, but before I erase those drives, found myself with a nagging question. Did my computer actually copy all my files correctly to the new drive?

Most file copy operations, including what I did with CarbonCopyCloner, are optimized for speed. They read the file from one location and write it to another without verifying that the file was written correctly. Verifying a copy would take re-reading each file and comparing them, which would take a lot more time. In the case of my 5.5TB of data, it would have to read 11TB total of data. 5.5TB on the original drives, and 5.5TB on the copies.

Since my copies weren’t verified, it’s entirely possible that when I copied my files to this new drive, files that hold decades of work, valuable drum scans, irreplaceable originals and memories, that some did not copy correctly, and I could be losing some data. I used to accept that risk in the past, but experience has made me less willing accept it going forward. So what to do then?

CarbonCopyCloner has an option to compare your backup with your original, but for the size of my archive, it was going to be a very time consuming project, and difficult to organize. Fortunately I remembered Lloyd Chamber’s IntegrityChecker software that was designed to do just what I wanted.

First a couple lines about Lloyd and why I’m trusting his software to check my files. Many years ago I met Lloyd when he attended one of my workshops. He was using 8×10 film at the time and trying to push the bounds of what it could achieve…no minor feat. His film was of fantastic quality, but he was still not satisfied. He’s the type of person who obsesses over details in a way I greatly appreciate. But he’s not just a photographer. He has a couple patents to his name for compression technology he used in his very popular DiskDoubler and RAMDoubler software. He has the knowledge and experience to get very deep in the weeds of some interesting computer and digital imaging problems, and he blogs about lens and camera testing at diglloyd.com.

IntegrityChecker validates files in a very unique way. It creates a cryptological hash for every file on a storage volume that can be used to check if the file has been changed in any way. This lets you check the integrity of files and backups in the most efficient way I know how.

So now I’m in the process of creating hash files for my “original” disks. Once all the hash files are created, I’ll use those to validate that my multiple backups are faithful copies of the “original.” That will let me have peace of mind that I have good copies of all my files, and let me decide which copies are redundant so I can re-use those drive.

This kind of integrity checking is something we should all do, but since it’s not built into the operating software we use, it doesn’t happen unless we seek it out. If this is something you’re interested in, check out IntegrityChecker on Lloyd’s website.

I think it’s important to note that this is more of a “expert” level tool. It’s offered in both GUI and command line versions, and it’s going to take some understanding of the underlying principles of what it’s doing if you want to apply it correctly. Because of that, it’s not a tool for everyone, but it’s one I wish I had started using a lot sooner. For now it’s the easiest way I know to ensure my files copy correctly and don’t change once they are copied. Check it out and see if it belongs in your toolbox.

Hard Drive Costs Late January 2020

Current hard drive costs at a glance with links to purchase from Amazon. I recommend Seagate hard drives because they continue to test as some of the longest lasting drives at backblaze.com.

Highlights for January include a minor price increase on 6Tb and 10TB external drives, as well as slight changes to internal drives as noted. The days of storage prices dropping quickly seem to be over as drive capacities become so large. Also of note is that 2Tb external drives are now all “portable” meaning they are 2.5″ laptop drives that are bus powered. For my main storage I prefer to have external 3.5″ drives that are plugged in to an external power source, so that means buying a 4TB drive or larger.

10TB external drives are still a big savings over 10TB Internal drives. Also, on a cost per TB basis, 10TB drives are getting close enough to the sweet spot of pricing to make them attractive if you need that kind of storage. But I generally don’t recommend buying more than a year’s capacity at a time to protect from price changes. Also remember that a properly backed up “storage set” requires three drives, so buying more than you reasonably need (over provisioning) can suck up a lot of money.

Sometimes external drives are less expensive than internal drives. Advanced users may want to explore “shucking” external drives to save money as the external drives are often, but not always, SATA drives that can be used as an internal drive.

EXTERNAL

2TB $59.99 ($30 per TB) 2.5″ USB powered portable drive
4TB $89.99 ($22.50 per TB)
6TB $109.99 ($18.33 per TB) +$10Change
8TB $139.99 ($17.50 per TB)
10TB $199.99 ($20 per TB)+$20 Change

INTERNAL

2TB $49.99 ($25 per TB)
4TB $79.99 ($19.99 per TB)-$10 Change
6TB $131.99 ($22 per TB)
8TB $149.99 ($18.75 per TB)
10TB $252.98 ($25.29 per TB)+$12 Change
12TB $327 ($27.25 per TB)+$15 Change
14TB $439.99 ($31.40 per TB)
16TB $484.99 ($30.31 per TB)+$6 Change

I’m an Amazon affiliate so I receive a small commission from each sale.

Canon PRO-100 Printer for $179.99

B&H has a great rebate on the Canon PRO-100 printer for the next few days if you are looking for a bargain printer to print photos at home. This is the same printer I’m currently using on my workshops because it’s portable and produces pretty good quality. Larger printers don’t like to be moved because they can spill ink and they are heavy, so this is a good choice for my workshops needs when I need to bring a printer.

This printer first shipped in 2012, so it’s not the latest technology, but it does offer three shades of gray ink which helps B&W photos look better. If you want something better, you’ll be spending in the $600+ range. The PRO-1000 will offer you much better print quality, but the PRO-100 (confusing names, right?) is a great choice for someone who wants to print at home with good results but wants to spend as little as possible.

Printers are “disposable” items. The cost of a full set of ink for this printer is $125, and a print head is in the $200 range, so you are basically getting a free printer. And if it dies, the cost effective solution is to just buy another one. Or buy the Canon extended warranty from B&H when you purchase.

A couple buying tips here.

Buy the Extended Warranty

Always buy the manufacturer extended warranty for your printers. There are all kinds of ways they can fail, and with more expensive printers, it can cost you a lot of money. Buy the extended warranty and roll it into the total cost of ownership. If your printer dies out of warranty, it’s often more cost effective to just buy a new printer.

Wait for Rebates/Sales

Canon and Epson are always running sales and rebates on their printers, so never pay retail! Wait for rebate. Rebates are often vendor specific, so it pays to look at multiple vendors when you are ready to buy.

Printers are “Disposable” Items

A full set of ink for this printer is $125, and a print head is in the $200 range, so you are basically getting a free printer. If it dies, the cost effective solution is to just buy another one. Or buy the Canon extended warranty from B&H when you purchase and let them deal with it.

It’s a great deal while it lasts if the more expensive printers don’t fit your budget.

FYI, I am not a B&H affiliate, so they aren’t paying me to write it. 🙂

A Cheaper Storage Upgrade

Seagate 2TB External Drive

If you are sick of my articles on Drobo/NAS/DAS/RAID storage solutions because they are just overkill for your needs, you are in luck. I’m laid up with the flu, which is a perfect time to dump out some different storage solutions because it doesn’t require the same part of my brain the creative photography content does. 

Talking with a friend yesterday about some upgrades for his mac that was running slow and we got around to his current storage shortage.  (Yes, I have a lot of photographer friends, a side effect of this incurable disease I have called photography 😉

After helping him spend about $300 on a RAM and SSD boot drive upgrade for his 2015 iMac, the budget was tight for storage. He wanted to set up a new Storage Set that would be dedicated to RAW files, and include his existing archive of 700GBs of existing RAWs. (See my Freemium Backup and Storage Plan article for an explanation on what a Storage Set is. )  

He settled on buying three 2TB external drives for a total cost of about $179. One would be the master, and two would be exact clones using CarbonCopyCloner. This would let him transfer his existing 700GB of RAWs to the new storage set, and leave maybe a years worth of space for new RAWs from his 45mp camera. The $179 price is an easy bill to afford, and way less than film and processing used to cost, so even if it ends up being a little undersized, it gets him through till his high season for photo sales. 

Putting all your RAW files on a separate drive is a great way to segment your data. Since these files will never be modified directly, the backup needs are greatly minimized for that master volume. Your modified RAWs can live on a volume set aside for more active files in the case of Photoshop, or in your catalog for DAM (digital asset management) programs like Lightroom. 

So why not a RAID in this case? While RAID is a very nice to have, it’s not always a need as long as you are very diligent in doing regular backups. This solution works in keeping the data safe and accessible for very little money. 

My storage articles over the last few weeks weren’t meant to say you need RAID, but rather to explore what they do and how to manage them based on my experiences managing a lot of spinning disks in Mirrored RAIDs and Synology NAS systems. I used to be able to heat my office in with three Mac servers and forty odd hard drives West Coast Imaging required, so to say I’m very close to this subject is an understatement…lol. 

Sometimes inexpensive solutions are the best solutions, and as I shared with my friend, there are always more things to spend money on in photography. Saving money for him means more days on the road having more adventures and making more photographs. So “just enough” is always the right size. Owing spinning disks is not our goal in life. 

Monitor Recommendations November 2019

A friend’s long used Apple Cinema Display is dying and asked if the recommendations I made earlier this year for color accurate displays still hold true. His expectations are similar to mine, which is very high, as the work he does is for fine art prints, books, and magazine publication. Here’s what I shared with him.

Here’s my current recommended color accurate displays:

PA271Q-BK-SV  27 inch model for ~$1450 from newegg, BH, or Adorama
PA243W-BK-SV  24 inch model for $899 at Amazon and Newegg

What about that new 31 inch display?

NEC replaced their previous color accurate 31 inch display with the new PA331D. Based on my past experience with NEC, I am confident the color will be great . What gives me pause is it’s pixel pitch of 149 pixels per inch on screen. The other NEC displays I recommend have a pixel pitch of about 100 ppi. Higher ppi on a display makes it more difficult to judge images at 100% Actual Pixels Magnification. This means it could be more challenging to preview sharpening effects as they will be hidden by the higher resolution. Maybe it’s just a matter of finding a new methodology to view the image at a higher magnification, but it’s a bridge I haven’t had to cross yet.

I’ve also recently had the chance to preview the quality of one of the Eizo line. From my brief examination, it seemed incredibly accurate. But I still don’t have enough personal experience with it to say which model will produce the results that I’m used to.

I’m fighting a flu that has taken down my whole family, so I’ll cut and paste what I shared with my friend about buying a color accurate display:

There is a 31 inch model that is quite a bit more. For imaging I think 24 inches is a good fit, and larger can get overwhelming, but the extra screen resolution and size of the 27 inch makes it great for working on two documents side by side and other layout/non photoshop type products.  Even with the 24 inch, I cover up have the screen when dust busting at 100% because it’s just too much screen to take in all at once. 

Make sure to get the exact model listed as the PA243W-BK doesn’t contain the calibrator that the PA243W-BK-SV does. You should buy the calibrator as it allows you to use the NEC calibration software that calibrates at 16 bits and it really does let you resolve more tones than other systems. The technology has advanced sufficiently that i’s time to upgrade whatever calibration system you have. 

Figure this monitor will like last 7-10 years based on my past experience with NEC displays. 

These are a pain to buy from Amazon because their listings often don’t include enough information to make sure you are getting the right model. No idea why but that’s been the case for years.