Lightroom vs Photoshop: Do I need Both?

Photographers get pretty dogmatic about what processing software to use. We do that with camera brands too, but that’s a story for another day. Often these dogmatic positions are based on emotions rather than a thorough understanding of both the tool and the result we wish to achieve, and that stops us from growing as photographers.

I’m going to suggest that your toolkit shouldn’t be either Lightroom or Photoshop, but both. 

Most photographers I meet primarily use Lightroom for processing. That’s no surprise, because Lightroom took most of the things that were hard about Photoshop and made them easier to access and harder to mess up. So right from the start, Lightroom and Photoshop were designed to use different methods to achieve a satisfyingly processed photo. Different means different, that that means we’ll usually get different results too. 

If computers generally frustrate you, Lightroom is the better choice. It is going to hide a lot of the process from you so that you can’t mess up your files as easily, and with many photos it is possible to make pleasing results. 

But the more serious you get about your photography, the more time you spend at it, the more you should consider learning Photoshop and the added tools it gives you. You can do it…It’s just another tool like many you have mastered in your lifetime from driving a car in city traffic to the expertise that allow you to be successful in your profession. 

Photoshop has a reputation for being hard, and honestly there are way more ways to mess things up in Photoshop if you don’t have a solid workflow. But once you get a good foundation, Photoshop becomes easier to work in that Lightroom in many ways, and lets you achieve a higher level of precision and exert more control over the process. 

The thing is, all those things you need to learn to understand Photoshop, the things hidden in Lightroom, are things you need to learn to take more control over your photographs. There are a lot of ways Lightroom can bite you hard too. I know experienced photographers who have lost entire catalogs of photos because of one wrong click in Lightroom because they were lulled into a false sense of security. Lightroom isn’t perfect and neither is Photoshop. It’s always up to you to know how they work and make sure they are doing what you want them to do and not do things that are destructive to your photo archive. 

The fact is, if you want to grow as a photographer, you have to become more versed in all aspects of the process. It’s not about which software you use, but about how you think about the problems you need to solve, and understanding which tool lets you solve those problems to your satisfaction. 

The honeymoon phase of photography is when you like everything you do and it seems easy. But the real fun starts when you start to see beyond your current experience, and feel that drive to get more from your photos. That’s when the real learning starts, and when things get really rewarding. 

So I’d encourage you to make this the year you start using Lightroom AND Photoshop, and break through the barriers that are keeping you from using one or the other. In the process you’ll gain some new skills, and feel more confident in whatever processing choice you make.

Photoshop Upgrade Issues – Adobe Camera Raw

If you’ve upgraded to Photoshop 2022, make sure Adobe didn’t wack your Adobe Camera Raw preferences or you could be wasting hours of work.

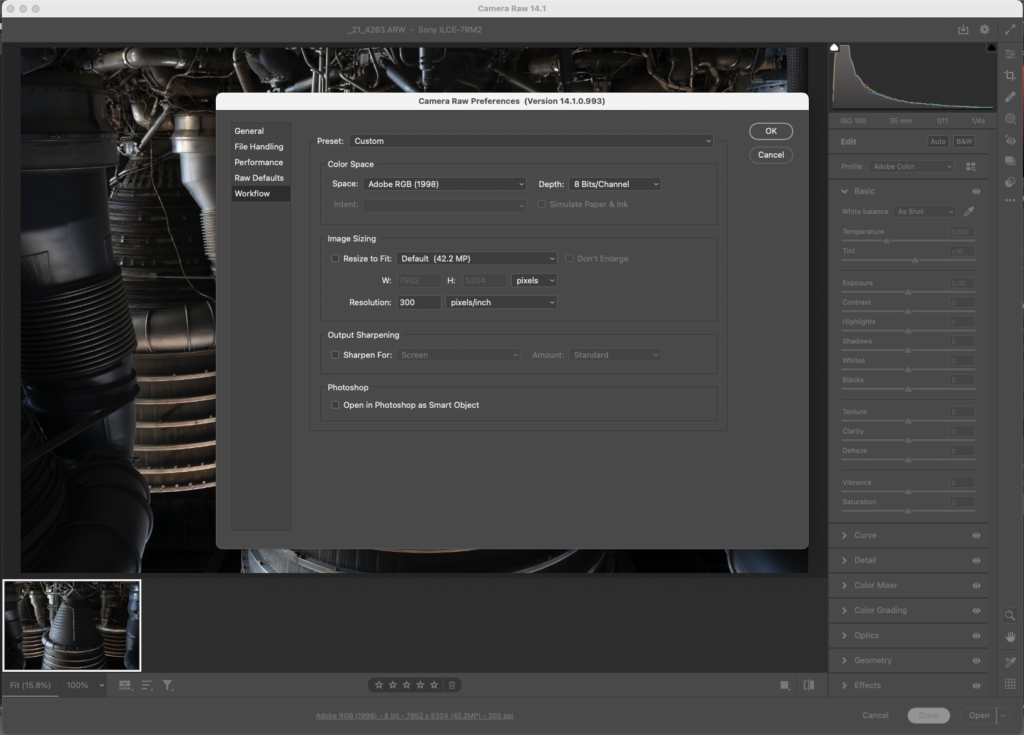
Adobe is allowing a critical problem to occur when you upgrade Photoshop by defaulting the Adobe Camera Raw settings from the user’s custom settings to their default “Adobe RGB” in 8-bit.

This is one of those things that is very easy to overlook and can lead to hours of lost work if not corrected immediately.

Here’s what my recent install of Photoshop 2022 did to my Adobe Camera RAW settings:

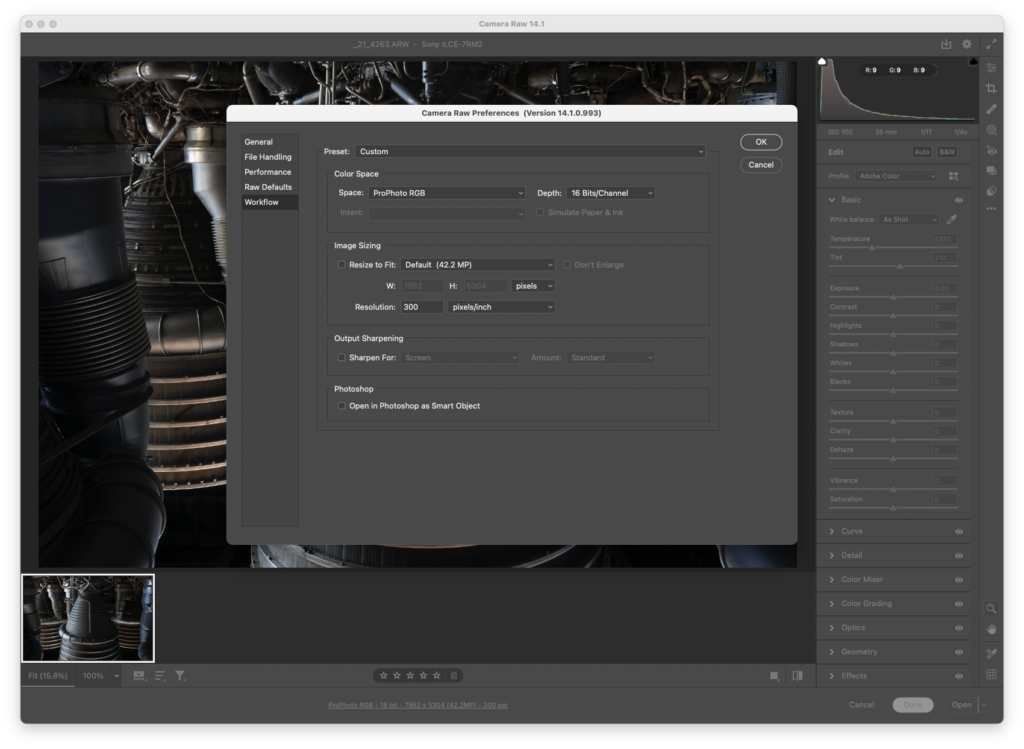
Yuck! Adobe RGB in 8-bit is the last settings I’d want to use. What it should have done is import my settings from Photoshop 2021 to what’s shown below:

ProPhoto and 16bits/channel is my recommended setting to get the most out of your RAW files. It’s the default for experienced users, and should be Adobe’s default too.

AdobeRGB was a bad choice in 1998 and it is a bad choice now. In the embryonic days of color management when we were all figuring it out, I did a lot of work in SMPTE 240, a very similar space to AdobeRGB. That is until I learned it’s problems and found better colorspaces. Adobe should keep up with the times and ditch the vanity nameplate colorspace.

One of the hassles of updating mission critical software is making sure all your preferences and presets are configured correctly. It’s why I find upgrades painful even if they offer new features as they create downtime. I get joy from working up new photos, not solving software issues. So these things really frustrate me.

Printing Issues After Software Update

When your prints come out looking completely different than last time, it makes for a frustrating morning. 

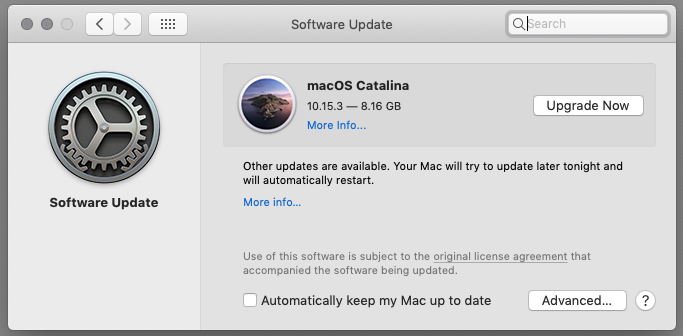
This morning I tried to print with my MacBook Pro fresh of an update to Catalina, the latest software it can run. The first print came out looking odd. So I compared it to a previous print, and my color memory was correct, it did not print properly. 

Time to start troubleshooting. I picked a second photo and printing it, triple checking that I chose all the correct settings.  Same problem. So I print it again with a different profile to see if the profile is the problem. Still wrong. SO I try it on a completely different paper and profile. Still wrong. Possible root causes are going through my mind this whole time. 

Maybe it’s the ink starvation issue I had when this printer was new that caused one of the colors to drop out? So I pulled out the special test sheet made specifically for this purpose. The colors didn’t match, but they all printed. So probably not that. Another sheet of paper burned with no fix. 

I’m about six sheets of paper in at this point, and that is always frustrating because I hate wasting paper and money. But burning paper is part of troubleshooting a printer so I fordge ahead. And my heart rate is going up as I think about at best spending the next day or so remaking profiles, or at worst dropping $800+ on a new print head and the ink needed to install it. 

With this latest piece of data, I realize I’m chasing my tail, and before I go down the road of more involved solutions, I need to try printing from a different computer to isolate if this is software or hardware related. Time to fire up the mac mini that I had validated last week as “working.”

Eureka! That fixed it. My heart rate goes down, no need to buy an expensive print head to fix it, or reprofile all my papers.

So what happened? Likely a software issue when I updated my MacBook Pro, probably the print driver. A reinstall of the print driver with the latest version should fix it. But that can wait for another day when I’m not trying to make Christmas presents. 

Today’s difficulties are one of the reasons I am very cautious about major updates to my computers. Updates cause issues and deviations from the carefully controlled environment needed to make consistent, accurate prints. 

Furthermore, my printer and monitor rely on third party apps to work correctly, and it’s common  for vendors to take months after a major software update to write new ones that are compatible. NEC had to write the Spectraview app I use to calibrate my monitor, and IIRC it was months after OS 11 came out. Not good…I couldn’t go without my calibrated monitor for even a few days. 

So some takeaways from this. 

1. Software changes and or updates can cause changes to how your printer prints color, so only update when you have time to troubleshoot the problems it can cause. Expect problems and the need to revalidate your printing setup after updating system software or print drivers. In general, it is best to wait at least six months after a major system software update to upgrade to give time for the bugs to be worked out. Identify all mission critical software and ensure it works properly with the OS you are updating to. And it helps to have a way to be able to “roll back” to your old system software if the new version doesn’t work. 

2. Diagnosing problems is much easier if you have test prints that validate previous printer settings so you can compare your new setup to your previous approved setup. I find few people do this, but it’s a vital part of my workflow. And a reminder that I need to finish the curriculum for my color management workshop. 

3.It’s helpful to have two different computers you can print from to test if a problem is printer or computer related. This also helps during software updates because it gives you a way to continue printing from a known setup while troubleshooting issues. This helped save my bacon today. 

Had I not had a second computer to print from, I might have started more invasive fixes that still wouldn’t have worked because I’m working from a fault tree that is in my head. So maybe my next step is to create a printed fault tree to help me solve these problems instead of having to tease out the answer every time and risk missing a critical fault finding step.

File Backups – Checking for Copy Errors

One of my “safer at home” projects is updating my file storage system. The drive I put new camera captures on was getting close to filling up, so I needed to expand my system by purchasing a 8TB Seagate external drive that could hold the contents of a partially full 6TB drive, along with the contents of a partially full 2TB drive.

It took me many hours of copying with CarbonCopyCloner to transfer the files from both drives to the new 8TB drive, which always tests my patience, and my tendency to want to watch the pot to see if it’s boiled.

With the copy complete, the next to do is a major reorganization of my folder structure to better fit my current needs and to work with my backup scheme. As part of this, I’m going to erase and reuse some older backup drives, but before I erase those drives, found myself with a nagging question. Did my computer actually copy all my files correctly to the new drive?

Most file copy operations, including what I did with CarbonCopyCloner, are optimized for speed. They read the file from one location and write it to another without verifying that the file was written correctly. Verifying a copy would take re-reading each file and comparing them, which would take a lot more time. In the case of my 5.5TB of data, it would have to read 11TB total of data. 5.5TB on the original drives, and 5.5TB on the copies.

Since my copies weren’t verified, it’s entirely possible that when I copied my files to this new drive, files that hold decades of work, valuable drum scans, irreplaceable originals and memories, that some did not copy correctly, and I could be losing some data. I used to accept that risk in the past, but experience has made me less willing accept it going forward. So what to do then?

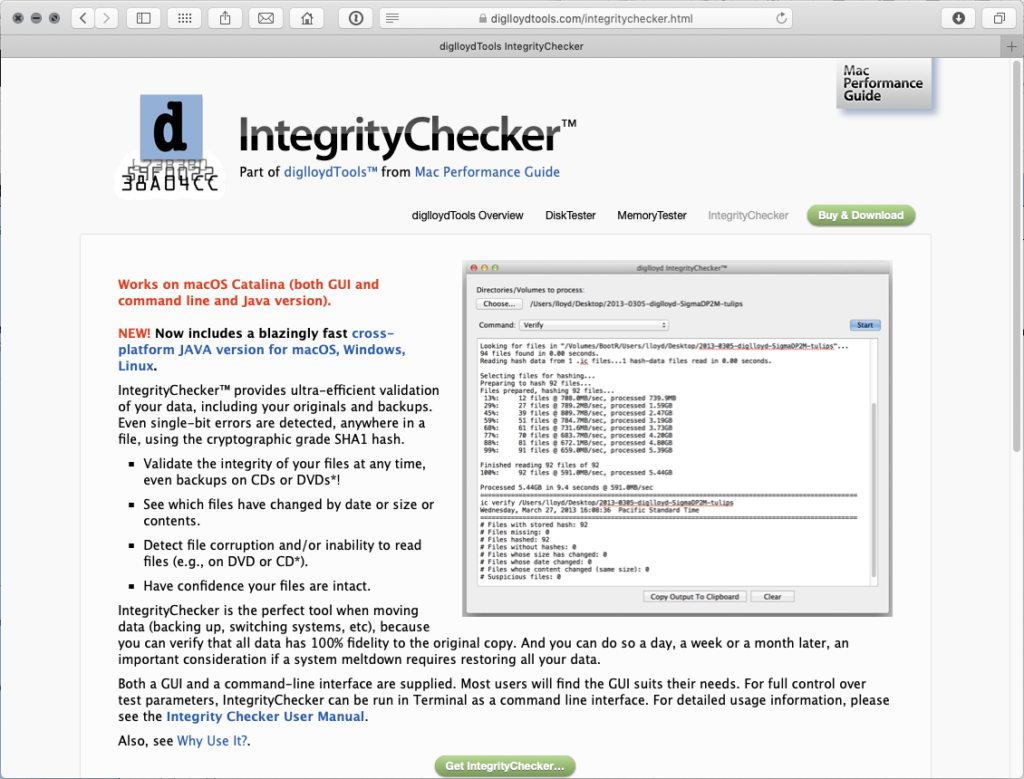
CarbonCopyCloner has an option to compare your backup with your original, but for the size of my archive, it was going to be a very time consuming project, and difficult to organize. Fortunately I remembered Lloyd Chamber’s IntegrityChecker software that was designed to do just what I wanted.

First a couple lines about Lloyd and why I’m trusting his software to check my files. Many years ago I met Lloyd when he attended one of my workshops. He was using 8×10 film at the time and trying to push the bounds of what it could achieve…no minor feat. His film was of fantastic quality, but he was still not satisfied. He’s the type of person who obsesses over details in a way I greatly appreciate. But he’s not just a photographer. He has a couple patents to his name for compression technology he used in his very popular DiskDoubler and RAMDoubler software. He has the knowledge and experience to get very deep in the weeds of some interesting computer and digital imaging problems, and he blogs about lens and camera testing at diglloyd.com.

IntegrityChecker validates files in a very unique way. It creates a cryptological hash for every file on a storage volume that can be used to check if the file has been changed in any way. This lets you check the integrity of files and backups in the most efficient way I know how.

So now I’m in the process of creating hash files for my “original” disks. Once all the hash files are created, I’ll use those to validate that my multiple backups are faithful copies of the “original.” That will let me have peace of mind that I have good copies of all my files, and let me decide which copies are redundant so I can re-use those drive.

This kind of integrity checking is something we should all do, but since it’s not built into the operating software we use, it doesn’t happen unless we seek it out. If this is something you’re interested in, check out IntegrityChecker on Lloyd’s website.

I think it’s important to note that this is more of a “expert” level tool. It’s offered in both GUI and command line versions, and it’s going to take some understanding of the underlying principles of what it’s doing if you want to apply it correctly. Because of that, it’s not a tool for everyone, but it’s one I wish I had started using a lot sooner. For now it’s the easiest way I know to ensure my files copy correctly and don’t change once they are copied. Check it out and see if it belongs in your toolbox.

Don’t upgrade your software during Corona Virus!

Right now as we’re all on some sort of lockdown for Corona Virus and many stores and services are limited, I’m recommending you don’t update your software, particularly system software.

Updates don’t always go right, and sometimes they can take down your system. If that happens you might be stuck without the use of your computer, phone, or favorite software for an indeterminate amount of time.

I learned this the hard way many times over in my years of managing the servers and IT at West Coast Imaging. So much so that I set up rules for when I would never start a upgrade or major IT project. Here’s a few I can remember off the top of my head:

  1. No upgrades in the week before a trip. Having your system down when you are trying to focus on a trip is a real drag.
  2. No upgrades before a major project. My workflow is carefully validated to produce the results I expect. Software updates can throw kinks into that workflow, and that’s the last think I want when working on a deadline project.
  3. No upgrades going in to the weekend. I spent too many weekends at work over the years. Don’t set yourself up for a problem that will take your days off to fix.
  4. No updates when a major storm is predicted. (Winter storms could shut down our small mountain town entirely!)

A quick look at these tells me that now is not the time to upgrade. Basically, remember that Murphy’s law is always in effect, and don’t start a mess you can’t get yourself out of. I’ve been bit more times than I care to remember on what I though would be simple, quick upgrades. Fortunately I know how to get myself out of most of the messes, but there is still a cost in time and frustration. If you don’t know how to fix it yourself, don’t do it till this health crisis is over.

I’d recommend that you go through your devices and software and turn off the “Auto-Update” features so that you can be sure nothing updates without your permission. Auto updates are ok for email and web only users who don’t rely on their computers. I work on mine and down time hurts me and is frustrating. In my case, I want every update to be something I plan and initiate.

Before major updates, like system software or critical software, I always do three fresh clones of my boot drive so I can quickly “roll back” to a previous state if the update fails or is wonky. And the times I’ve need those backups, I’ve REALLY needed them.

And while I’m on the subject, don’t be the first to install new updates or new versions of software. With system software, give new versions about six months for the bugs to be worked out, and a couple months for the incremental security updates. For software like Photoshop, I give it a month or two, and I usually keep the old version installed so that I can still use it if Adobe mucks something up.

And if you’ve had an upgrade disaster happen like I have, share it in the comments so I can commiserate with you!